Monday, October 28, 2013

Weinerdillas or Pigs in a Sarape

I came up with this little recipe between my love for hotdogs on the grill and quesadillas.  This is something the kids and your entire family might like. Sometimes I have more hotdogs than buns, so one day I noticed I had some flour tortillas left over and came up with this little gem. With the weather changing I'm not going to have many grilling days left, so let's get at it.

Ingredients
6-8 hotdogs
6-8 flour tortillas
1 8 oz package of shredded Colby/Jack cheese
1 can chili with beans (opt.)
1 cup sour cream (opt.)
1 cup salsa (opt.)

Preparation
First grill your hotdogs on your outdoor grill, take a tortilla and spread about an ounce of shredded cheese on it.  When your hotdogs are done, roll it up in the tortilla while it's still hot.  Let sit for a minute and the cheese will melt keeping the tortilla in the wrapped position.  Lay these back on your grill and let the tortillas get some color on them.  You can serve them with chili poured over the top or by mixing the sour cream and salsa together. Top them with some diced green onions for a little extra happiness.

If you don't have a grill, outside or in, you can cook the hotdogs on the stove, roll them in the tortillas and then place them in an oven to brown.  I sometimes make a dipping sauce of mayonnaise, creole mustard, and hot sauce to rub them around in.  These little guys are great!  BTW as you can see from the picture, I like my hotdogs charred black on the grill.

Cheers!

RouxBDoo

Wednesday, October 16, 2013

Mamaw Harkleroad's Fried Pies

My Grandmother Bessie Lee Stokes Harkleroad was a wonderful cook, what I remember of her food was it was very simple and tasty.  She passed away when I was 10, so I didn't get to enjoy much of her cooking.  One thing I remember were her fried apple pies.  She made them with her biscuit dough, rolled them out and filled them with fried apples. She would then fry them in a cast iron skillet in a little butter and oil.

This type of pastry is similar to a Mexican empanada.  Unlike pie dough, this biscuit dough if soft and very flavorful. I'll give you an easy biscuit recipe to follow.

Ingredients
1 batch of biscuit dough
2 apples (diced small)
1/2 tsp cinnamon
4 tbs sugar
1 pinch of salt
3/4 stick butter (divided into 4)
2 tbs oil

Biscuit Dough
1 cup self rising flour
1/4 cup shortening
1/3 - 1/2 cup buttermilk
1/2 tsp cinnamon
2 tbs sugar

Sift flour into a bowl, add and whisk together the sugar and cinnamon.  Work in the shortening either with a pastry blender, fork, or your fingers until it looks like coarse crumbs.  Add the buttermilk gradually while stirring it in. When all the dough is combined, dust it with flour, as well as dust your rolling pin.

In a saute pan, melt 1/4 stick of the butter, add the apples, sugar, and cinnamon.  Saute until the apples have softened and the sugar is making the apples all tan and sticky.  Take the pan off the eye and set aside.

Knead the dough 8 or 10 times and divide the dough into fourths, roll each piece into a ball between your hands and dust it well with flour.  On your kitchen counter or cutting board, lay down a piece of clear plastic wrap, and dust it with flour. Have another piece of plastic wrap ready.  Flatten the ball of dough in a circle, dust well and lay the other piece of plastic over it.  Roll these out into a thin flat circle 6 to 7 inches across, about the size of a saucer.

Add a fourth of the apple mixture into the middle of the dough circle.  Moisten the edges with water and fold it over.  Use a fork to crimp the edge.  Repeat this process with all the dough until you have your 4 pies.

My skillet only has room for two, so I do them in batches.  Melt the 1 tbs of butter and a tbs of oil in the MED heat skillet, and fry each side until done, brown and crispy.  Try to only turn it once, these are delicate and can break if you handle them too much.

You can use Splenda with this recipe if you're watching your sugar, but I don't have the conversion on the amounts. You also could bake these, but they are so much better fried.  I like them like they are, but you can glaze them if you'd like.

Glaze
1 cup powdered sugar
1/2 tsp vanilla extract
1/4 tsp cinnamon
1 tbs warm milk

Combine all ingredients in a small bowl.  You might need to adjust the milk a bit to the consistency you like.  It should be a little runnier than buttercream frosting.

To my Mamaw Harkleroad, I love you and still miss you.  I think about you often what a wonderful beautiful soul you were.  I was very lucky to have two wonderful Grandmothers.  My maternal Grandmother Marylee Burnette was also a sweet lady and a wonderful cook.  I didn't get much time with either of them, but what little I did was great.  God Bless my Grandmothers.

RouxBDoo

Stuffed Halloween Mini-Pumpkins


Halloween treats for your dinner guests.
I was needing recipes for this blog for Halloween.  After looking around the internet and through some books, I came upon this recipe for those cute little mini-pumpkins that people decorate with around the holidays.  I never thought about whether you could eat these.  They are quite tasty, but you don't eat the skin.  When presenting these little beauties, be sure to tell your guests to scoop the goodies out of the pumpkin and leave the rind.

As a courtesy, I adapted my recipe from the one on this wonderful food blog Kumquat Blog. I did a few things different, but she has some great  recipes and pictures over there. Thanks to Gretchen for a wonderful blog, I love it.

Ingredients
4 mini-pumpkins (get the bigger ones)
1 lg apple (I like the Honey Crisp)
3 tbs sugar (you can use brown sugar)
1/4 tsp cinnamon
1/4 tsp nutmeg
1/2 tsp salt
1/2 tsp vanilla extract
2 tbs butter (melted)
1/4 cup chopped walnuts

Heading into the oven.
Preparation
First preheat the oven to 350 degrees.  Cut the tops off your pumpkins as in the photo and scoop out all the seeds and goo from the inside. Combine the sugar, salt, cinnamon, and nutmeg in a small bowl. spoon about a half teaspoon of this mixture in each pumpkin and rub it around inside.

Next dice up your apple (skin on) very small.  Combine the diced apple, melted butter, vanilla extract, remaining spice/sugar mix, and your walnuts in a bowl and combine thoroughly.  Stuff this into your little pumpkins and replace the lid.  It's okay to over-fill them a bit.

Place them on a cookie sheet with a piece of parchment paper. Give the pumpkins a little shot with cooking spray, place them in the 350 degree oven for 55 mins to an hour.  Let them cool slightly before eating. That's it.  Easy, peasy, pumpkin squeezy.

Happy Halloween

RouxBDooooooooooo

Tuesday, October 15, 2013

Mississippi Crock Pot Roast Beast

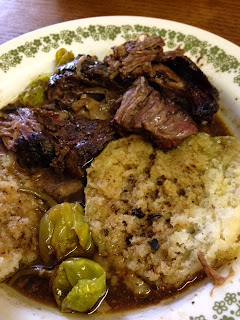
Roast Beast with biscuits.
Okay, here's the deal.  I have rarely, if almost never, have cooked in a crockpot.  I don't even own one.  I had to borrow my neighbor Jessica's crockpot to make this recipe, but I HAD TO, tell you why.

As you folks well know, anytime anything goes viral on the internet, everyone's talking about it.  This recipe was one of those.  This recipe was like an urban legend, so it being close to Halloween I thought I'd make it.  Now there's nothing supernatural about it.  You don't have to chant the words "Pot Roast" in the mirror 13 times for it to appear, but the method is quite strange for cooking this beast.

I found the recipe several times on the blogs and sites and all pretty much stuck to the gospel.  Same ingredients, cooking time, claims of disbelief, but their families loved it.  Some make it every week, some twice a week.

What's funny is in the comment section of the blogs that posted this recipe.  I have always noticed this but for this recipe it was rampant.  After the blogger posted the recipe, about half of the comments were "Awesome", "Amazing", "Delicious", but then the other half, while complimenting them, kept posting what they did different form the recipe.  It would be like, "Well we're watching our sodium, fat, red meat, and can't have anything spicy, so I substituted red wine for the au jus, left out the ranch mix completely, exchanged the beef for chicken, and substituted the pepperoncini peppers with kumquats.  It was awful."

Yep, that's a stick of butter.
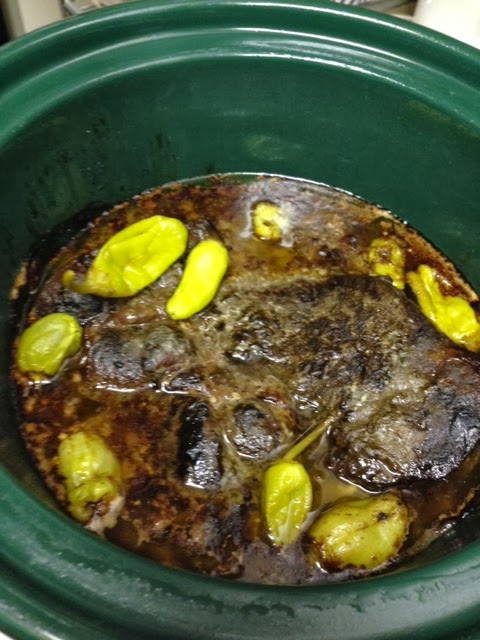
So I made the recipe EXACTLY as written, (I did add 3 extra peperoncinis since they were small) and cooked it overnight in my neighbor's crockpot.  The next morning the air was heavy with savory beef fumes.  This thing smelled GREAT! I quickly made a pan of biscuits and tried out my roast beast.

Now, I will tell you this up front, I expected it to be so tender it would fall apart before you could lift it with a fork.  It wasn't quite that way.  It was tender-ish, but did it ever have a great flavor.  Man the meat and resulting au jus, (gravy) was amazing.  Those little peppers added the right combination along with the mixes I added.  You have to give this recipe a spin when you can.  Maybe an upgrade in the grade of chuck roast, or longer cooking time might make the tender factor elevate.

Be sure if you make this, and love it, to tell me what all you did different from the recipe in the comments you leave.  Just kidding, I rarely get comments except from my friend Ramona, whom I love for reading my blog every time.

Sorry, I am obliged by "Blogger  Law"
to display the ingredients.
Mississippi Pot Roast
1 beef chuck roast, 3 - 4 lbs
1 packet McCormicks powdered Au Jus mix
1 packet Hidden Valley powdered  Ranch Dressing mix
1 stick of butter
6 - 8 pepperoncini peppers

Preparation
Spray your crockpot with non-stick cooking spray, place roast in the pot, cover top with ranch mix and cover that with au jus mix.  Lay the stick of butter on top and scatter the pepperoncinis over the top of the powder covered roast.  Replace lid and cook for 8 hrs on LOW.

Now, here's the warning.  DO NOT ADD WATER.  This roast makes its own juice and blends it with the butter and mixes and... oh bru-thuh is it good.  Try it over biscuits like I did, you'll thank me with a big ol' sloppy kiss.

That's it!  Can't mess it up.  If you do, please write me a comment telling me what you did to mess this up.  I'll add it to the "we used wine" "we hate peppers" "I'm a vegetarian, can I make this without meat" comments which always follow a recipe like this.

Drag out that crockpot of yours, or borrow the neighbor's, run to the store and make this recipe.  Else you'll always wonder if it was true... what they said about that roast on the internet.  Oooooooooo.

"Don't believe everything you read on the Internet" -Abraham Lincoln

I'll have some Halloween fun on here in a few days.  Keep the SPIRIT!

Roux-B-Doo-B-Doooooooo

Friday, October 11, 2013

Savory Bread Dressing

 I love dressing, or stuffing as some call it, it's my favorite part of the Thanksgiving/Christmas dinner.  Some like to ball it up or pat it out into patties, but I love it just baked in a pan.  I used some stale bread I had that was still good for this. A mixture of cornbread, biscuits, and sandwich bread made this tasty and varied in texture. You can add pumpernickel, rye, or about any bread to this recipe. Dice it up in small cubes and combine enough for 10 cups.


Ingredients
1 lg onion (diced)
4 ribs celery (sliced thin)
10 cups assorted bread (cubed)
1 tbs garlic (minced)
1 ½ - 2 cups milk
1 egg (beaten)
1 cup water
1 10 oz can Cream of Chicken soup
1 tbs rubbed sage
½ tsp pepper
½ tsp salt
1 tbs Tony Chachere's
1 chicken bullion cube
1 tbs dried parsley
¾  stick margarine or butter

Preheat oven to 325 degrees. Place bouillon cube into one cup of boiling water and dissolve. In a large stew pot on the stove (with a lid), saute' the onions, garlic, and celery in the margarine, or butter, add spices, and cook until tender. Add bread cubes to the onion mixture. Stir this well to completely incorporate the onions into the bread cubes.
Add the cup of chicken stock you have been boiling, stir it in well to distribute. In a bowl, whisk the egg and the can of soup into the milk. Pour this into the bread mixture. Stir thoroughly to make sure everything is blended well.
Place in the 325 degree oven for 55 minutes. After it has baked for 45 minutes, remove the lid for the remaining 10 minutes. You might want to let it go longer after you check it. You also might want your dressing a little wetter or dryer, you can adjust the milk content for this. Also, if you want to delete a cup of milk, you can add another 10 oz can of soup.

Enjoy this dish for the holidays.

Monday, October 7, 2013

Fall Carrot Salad

My Mom’s Carrot Salad is one of my favorite things she used to make and take to Church dinners and covered dish suppers. She’d always make a huge bowl of it, (hence the large portions in this recipe) but that meant we wouldn't have to worry if it would all be eaten up at church.  This dish is a little labor intensive chopping up the carrots, cooking the carrots, etc., unless you buy the frozen carrots.

I have cut this recipe in half most times I’ve made it.  I also slip a little hot sauce into the dressing you pour over the veggies.  Fall always dictates pretty orange colors, and this bright orange salad will hit the spot.  Even for non-carrot eaters.

Give this a try for your family or friends and I know they'll love it.  This is also a great tail-gating dish they'll all enjoy.


Ingredients
3 lbs fresh carrots (2 pks. frozen) - peeled and sliced
1 lg green pepper - julienned
1 lg onion - quartered and sliced in strips
1 can tomato soup
1 cup oil
3/4 cups vinegar
1 cup sugar
1 tbs worcestershire
1 tbs mustard
1/2 tsp black pepper
1/2 tsp kosher salt.

Preparation
Boil carrots in salt water until tender, drain and let cool. Layer carrots, green pepper, and onion slices. Mix the remaining ingredients, bring to a boil in a saucepan, and pour over the carrots. Cover the container, place in the refrigerator, and let it chill for several hours. Better if you let it sit for 24 hours.

RouxBDoo