Saturday, December 6, 2014

You're Tellin' Pork Pies Revisited, AGAIN!!!

My beautiful Christmas Pork Pie
Well, you're probably tired of Pork Pie talk, but I've been busy, working on recipes, converting measurements, and baking.  I have always liked the idea of a pie with meat.  Imagine my disappointment in my first experience with Mince Meat Pie.

I've always loved pot pies, "Steak and Kid-lee" Pies, and of course my famous Jamaican Patties.  I first had English Pork Pie in Grand Cayman.  There was a little bakery that made them.  I didn't understand you're supposed to eat them cold.  The traditional Pork Pie is made in England to exacting standards.  Melton Mowbray Pork Pies are the standard they must meet.  As I understand only a few pie shops and bakeries are allowed to use the Melton Mowbray designation. The Melton Mowbray pork pie is named after Melton Mowbray, a town in Leicestershire.  The Melton Mowbray Pie Association applied for, and won protection under the European "Protected designation of origin" laws, (much like Stilton cheese), so only certain companies are able to produce it.  A lot of commotion over a meat pie.

Pork Pie Hat
"Pork pie" is quite a popular term, in addition to an edible Pork Pie, there is also the hat called a Pork Pie.  Plus the term in Cockney Rhyming Slang that means you're lying.  "You're tellin' pork pies" tranlates to 'You're tellin' lies".  The rhyme for lies... pies.  For a better understanding of Cockney Rhyming Slang, go to the Cockney Rhyming Slang website and learn more.  It's complicated.


Traditional pork pies have a crust made different from any other pie.  It is a combination of pork lard, water, and milk, boiled together and mixed into the flour while still hot.  The dough is turned out and kneaded for about 5 mins.  Then shaped into a "can-like" shell.  Traditionally it is placed in a round, thick disk on the floured, work surface, and then built up (or hand raised) around a wooden, cylindrical, mallet-like utensil called a "dolly."  You can also use a glass jar or smooth can to shape the dough.  Here is a video of the traditional method of making an individual pork pie.  Some pies the pork has been ground and some has been chopped into small dice.  While some use only uncured pork meat, most recipes call for a combination of fresh uncured pork shoulder, pork belly, and smoked bacon.  I substitute the pork belly with smoked ham.  All these are diced small, approx 1/4 inch cubes.  You don't have to measure it, that;s just a reference.

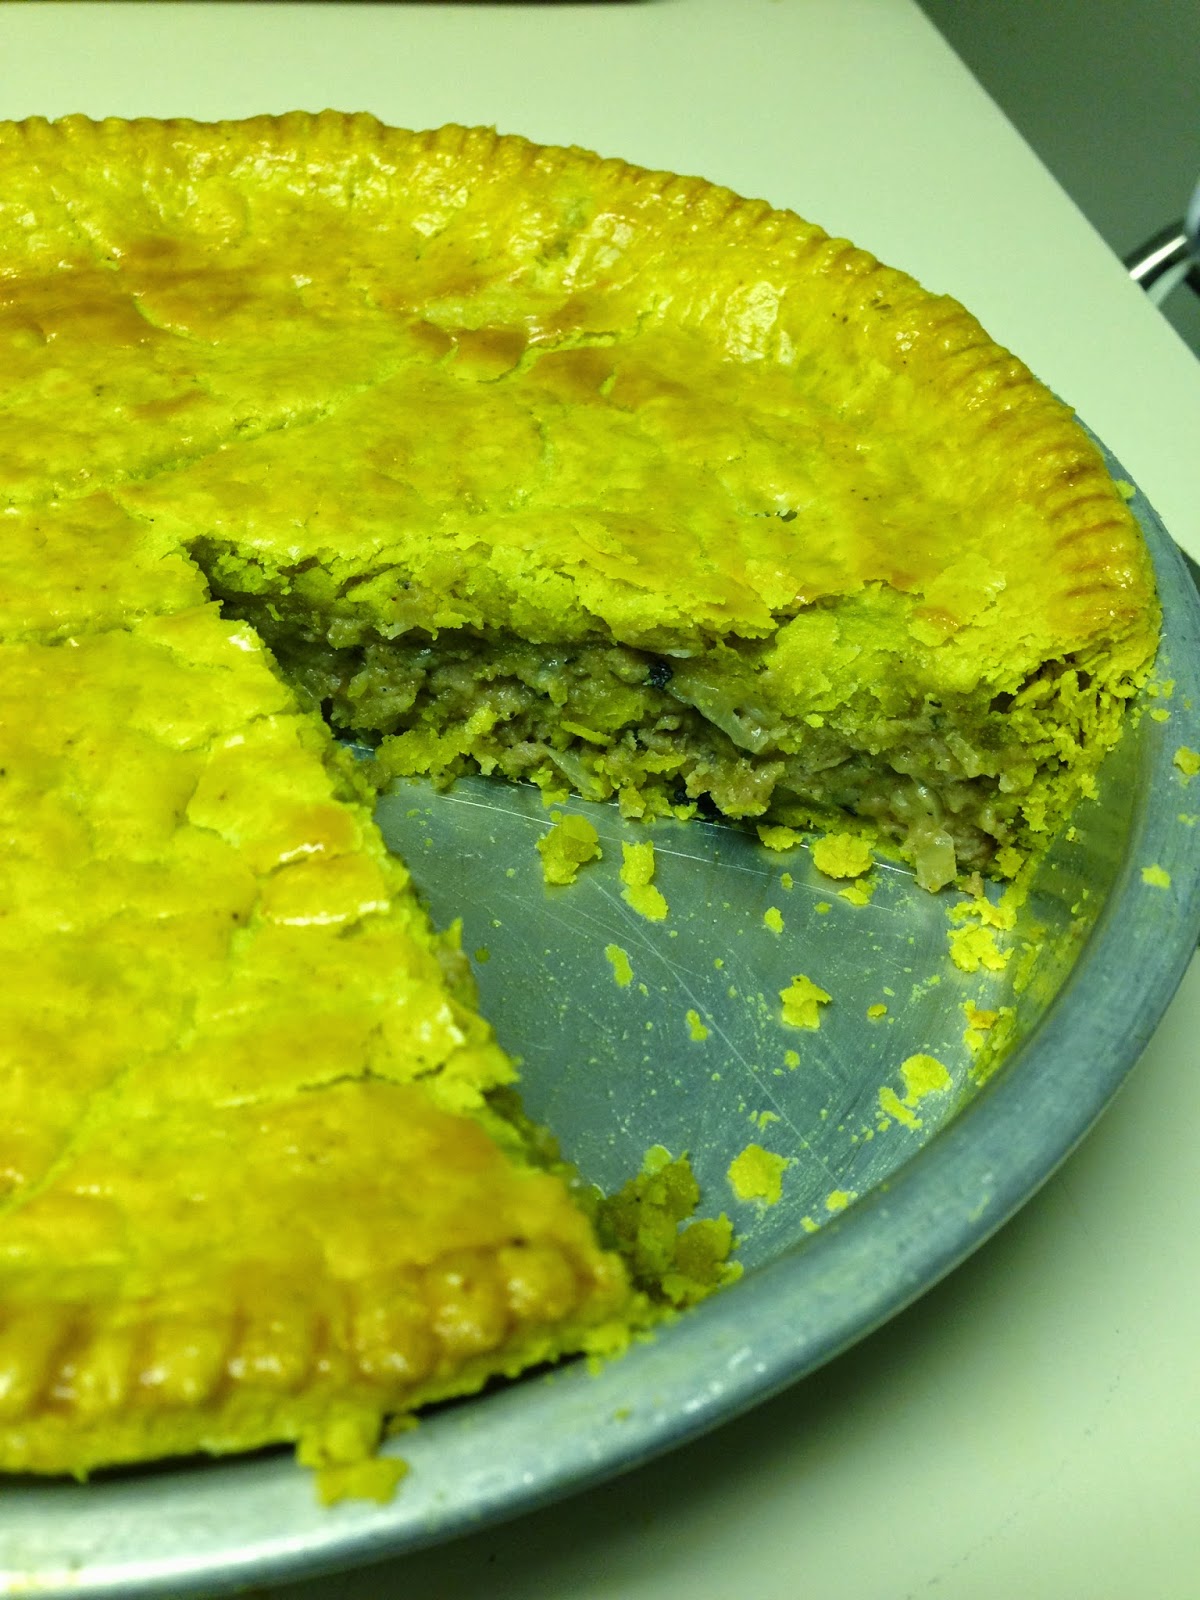
Cross section of my recent pie.  See the jelly?
So, if you're having a hankering to taste one of these pies, or you're a transplanted Brit, I'm gonna give you the recipe for making this wonderful treat.  As I understand it is also a Christmas morning treat in, not only England, but also in some French-Canadian traditions as well.  It can be decorated in a very festive manner, as you can see in the picture of one of mine.  Let's look now on how to create one of these pies, my way.

To start with, I use a 9" Springform pan to make my pies.  If you look there are other types of pans and containers to bake them in.  I like making one pie, big enough for a family or to eat on all week if I want.  Plus I like to decorate the tops of them and make them festive or Christmassy dusing the holidays.  You will see in some of the pictures I have included that there are different sizes.  Some of the pie manufacturers use a pie press to make the shells.  You can use whatever you have available to you, but this recipe is made to fit a 9" Springform pan.

Ingredients

Crust
2 1/2 cups of flour (AP)
1 cup lard
1/2 cup milk
1/2 cup water
1 teaspoon sea salt

Meat filling
1 1/4 lb pork shoulder
4 oz thick bacon
4 oz smoked ham
1 teaspoon sea salt
1 teaspoon allspice
1 teaspoon rubbed sage
1 teaspoon white pepper

Glaze
1 egg (beaten)

Jelly Stock
2 cups water
1 pork season packet (1 tbsp pork stock powder)
1 pack Knox gelatin
1/2 tsp allspice
1/2 tsp white pepper

Preparation

Dice the pork into small pieces less than the size of a sugar cube. Dice the ham and the thick sliced bacon the same size. Combine all three meats in a bowl, add your allspice, sage, salt, and white pepper to the meats and stir them thoroughly. Cover and let rest for a bit.

Preheat your oven to 425° Sift flour into a large bowl, and add salt. Mix the salt into to the flour thoroughly. Melt the lard in a sauce pan with the half cup of milk and half cup of water. When lard has melted and mixture is boiling, pour into the flour in the bowl. Use a fork to combine the flour and a lard mixture together into to a soft, pliable dough. Roll together into a ball and turn out onto a floured surface. Knead the dough for five minutes. After kneading the dough by hand, cut off one third of it for the top of the pie, (or the lid). Roll out the rest of the dough around a 1/4 of an inch thick, to where it will fit inside of your springform pan, all way up to the top. Press the dough gently into the corners of the pan.  Trim off any excess of the top of the pan.

Pork Pie Dolly for a "hand raised" pie
Next, scoop the meat into the pan and spread it out evenly across the dough. Roll out the remaining dough to make a lid, slightly wider than the pan. Crimp the edges of the lid with the edges of the dough of the inside of the pan to seal the top and sides together. Brush the pie with a beaten egg.  This helps to seal and glaze the outside of the pie, turn it nice and brown.  You want to cut a 1/4 inch, round vent hole in the center of the pie for adding your jelly stock later.

Place your pie in a 425° oven for about 40-45 minutes.  Next, turn the oven down to 350° and cover your pie with foil or a lid to prevent the top burning.  Bake the pie for another 45 minutes.  Remove the lid and let brown more if it needs it.  Check the internal temp with a cooking (or meat) thermometer, you want it to be over 165°.  I might actually be approaching 200°, which is fine.

Injecting the Jelly Stock
Now you need to combine the water, stock cube or powder, gelatin packet, the white pepper, and allspice in a saucepan and bring to a boil.  After the pie has settled for about 15 mins, you need to either use a small funnel, a baster, or a meat injector, and pump as much of the jelly stock, into that hole in the top of the pie, as possible.  Let it settle a bit and then add some more.  When your pie starts to overflow with jelly stock, you are done.  Place the pie in the fridge and try to be patient.

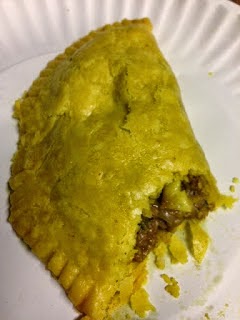
Next morning, your pie will be ready.  The jelly has set and you are ready to unleash the Springform prison keeping that lovely pork pie hostage.  The crust will be glazed and shellacked with egg, making it stiff and crusty.  Oh is it ever good.

BTW, you can use shortening and butter, or just shortening instead of lard.  It will still have the same consistency.  Slice you a piece with a nice sharp knife and enjoy.  If you really want to, you can warm it up, but I like it cold.

You can eat it with some H.P. Sauce, Branston Pickle, a nice mustard, or my favorite... pear or apple butter.  Maybe a good chunk of Stilton Blue cheese.  For the holidays I like a good homemade cranberry sauce.  You might just want it plain.  Either way, it's awesome.  Enjoy!

Cheerio!

RouxBDoo

PS  You can omit using the stock and gelatin for the Jelly Stock and use the traditional pig's feet boiled in water.  You boil a couple of pigs feet for hours, strain off the resulting stock or collagen, and pour or pump that into the pie.  The natural collagen should set up in a gelatinous state like the jelly.

I recognize that this pie is different from the "Official" pork pies in size and forming method, but this is close to a traditional pork pie.  If you're not satisfied, research it online like I did, and have fun!


Friday, November 28, 2014

RouxBDoo's Christmas Pear Butter Bread

I was never much of a baker.  I love to cook, fry, saute, etc, but baking has only recently interested me.  Of course I have baked biscuits, cornbread, etc but I am, more and more, looking for tasty breads and loaf cakes to experiment with.

This summer I made a ton of Pear Butter.  I had friends with wonderful pear trees just draped in pears.  We took advantage and made some of the best pear butter ever.  You can certainly use apple butter with this recipe since it's easier to come by.  You can also use raisins instead of the Craisins®, but I think that's part of it's charm.  As a matter of fact, I got the original recipe from AllRecipes.com and from a Apple Butter Bread recipe by a contributor named Bruce Stone.  I made some changes and this is my version.

I made this for Thanksgiving, but it's a very Christmassy dessert. The Craisins® in it are what makes it perfect.

1 1/4 cups pear butter (or apple butter)
6 tbs butter, softened
1 cup sugar
1 egg
1 1/2 cups plain flour
3/4 tsp baking soda
1/2 tsp baking powder
1/2 tsp salt
1/2 tsp ground allspice
1/2 tsp ground nutmeg
1/4 tsp ground cloves
1/2 cup Craisins® (dried cranberries)
1/2 cup chopped walnuts

Preheat your oven to 350º. Spray a loaf pan with Baker's Joy or a similar product. Combine flour with baking soda, and baking powder.  Next add salt, nutmeg, cinnamon, and cloves in the bowl and combine well with a wire whisk.  Next, in a separate bowl, use the wooden spoon to mix the butter with the sugar. Beat the egg, add it to the bowl, then the pear butter, combine all your these ingredients together. Add your flour mixture until just incorporated. Add the Craisins® and walnuts, mix well and pour into your loaf pan.

Bake in the oven for 55 minutes.  Turn off oven and let bread remain for 30 mins. until oven has cooled down.  Remove cake from pan and store wrapped in parchment paper, inside a gallon zip-loc bag.

Saturday, November 22, 2014

Christmas Party Swede-ish Meatballs

OK, it's nearing the holiday season where people are having special meals and parties.  I wanted to give you this easy recipe for Swedish Meatballs.  I can throw this together in about 15 mins, but it's better if you let them bake in the oven for a while.  You can make your own meatballs, but it is also easier and cheaper if you want to put this together in a hurry.

The ingredients are fairly simple for this.  Nothing exotic, but easy to find things at your local grocery store.  Just stir it up and toss it in the oven, you can even fix it on the stove-top. So here it is...

Ingredients:

1 pound frozen meatballs (about 32)
1 10 oz can Cream of Mushroom Soup
1 8 oz (or 1 cup) sour cream
1/2 tsp allspice
1 tsp dill weed
1/2 tsp black pepper
1 tsp butter
1 tsp minced garlic

In an oven-proof pot with a lid, melt butter, add garlic, saute garlic for a bit.  Add the soup and sour cream, combine with a whip or spoon.  add the spices, stir, then add the meatballs.  Place in a 350 oven for 30 mins. or just leave on the stove-top stirring periodically.  Keep warm in a crock-pot for the party.

Enjoy

RouxBDoo

Sunday, November 16, 2014

You're Tellin' Pork Pies Revisited

My Nautical Compass Theme Crust
OK, I know I seem obsessive, but these pies are wonderful.   Why did I create another post concerning these pies?  Well, I have adjusted the recipe and I am making them in my new Springform pan.  I made this pie last night and decided it was so pretty I would post it on my FaceBook page.  I got so many nice comments from friends, as well as "Likes" for the pics I posted.  SO, I decided to bring you up to speed.

In case you missed the recipe on RouxBDoo, here it is... Pork Pies.  Now, I have amended the recipe a bit to make it even more traditional.  I have added about a cup of diced smoked ham, as well as about 3 strips of thick sliced bacon (diced).  These ingredients should be added when you are cooking your ground pork.  I am also adding a nice 1/2 teaspoon of Allspice to the meat mixture.

My new springform pan is something I have been wanting for years, but never really had any use for specifically.  I can't believe though how easy it is to dis-lodge that sucker when it's finished.  I always dreaded trying to cut the first slice and maneuver it out of a pie tin.  Now, I just let it cool a bit, flip the latch and out comes Porky.  If you live in the states and have a Big Lots Store in your area, do yourself a favor and look in their kitchen supplies.  I found a set of 3 different sized springform pans for only $8.00.  They are all non-stick and work great.  Here's a link...  Springform Pan Set.

My Pork Pie in my new Springform Pan
I am not really completely satisfied with this dish though, I want to make a very traditional English version like the famous Melton Mowbray Pork Pies.  This requires a different pastry for the shell, a different shape and size, and a different process to make them.  Traditional English pork pies are put together with the meat being raw and minced into small morsels.  The seasonings are much simpler, salt, white pepper, and allspice (maybe some dried thyme).

After baking for a WHILE, you cool it off and add a collagen or gelatinous stock that holds it all together.  Some recipes have you making the "jelly", as they call it, from sheets of gelatin, or powdered gelatin, that have been dissolved in a stock or broth.  The more traditional version uses pig's feet, or "trotters" as the Brits call them.  These pig's feet are cooked slow in water and spices for hours until they fall apart completely.  They collagen and liquids are strained off and poured into a tiny hole in the lid of the pie. This is then cooled and refrigerated so that the "jelly" sets up, sort of like an aspic.  The tasty, savory, gel fills in all the little nooks and crannies, and makes the pork all happy.

A tasty slice of English Pork Heaven!
The pastry is made with lard, yes lard, which is boiled with water and combined with flour to make a warm pliable dough.  This is used to sculpt into a "Bristol Crock" shaped shell.  It's wonderful to watch.  There are several videos online detailing the process.  These pies are traditionally eaten cold, with a bit of fine mustard, or I like HP Sauce, on the side.

I'll have to say I am also interested in bucking tradition, and to try making these pies using different meats like lamb, chicken, and beef.  I think the lamb would be amazing.  Either way, stay tuned to this blog and we will publish our further foray into Pork Pies, just like me ol Mum used to make them.

Cheerio!!!
RouxBDoo

Monday, November 10, 2014

RouxBDoo's Crock-Pot Gumbo

Chicken and Andouille Sausage Gumbo
OK, I have used a Crock-Pot occasionally over the years, but I recently bought a new, large, Crock-Pot with a removable crock, which makes it easier to clean.  So far I have made Red Beans and Rice, Stewed Chicken Legs, and and Chili.  I had been wanting Gumbo here recently and a friend of mine from Louisiana sent me some nice Andouille Sausage.  So I tried my new Crock-Pot and Andouille at making gumbo... Ahhhh, I love the sweet smell of success when you wake up in the morning with a kettle full of Gumbo.  Needless to say, it was successful and tasty.

I suppose you could use this recipe to make seafood gumbo, but I wouldn't put the seafood in the Crock-Pot until the last hour.  This is a Chicken and Andouille Sausage Gumbo using a rotisserie chicken from the Grocery or Mega-Mart store.  You need to make the roux first on your stove, you can buy pre-made roux in some regions, I have no experiience with it to give you an opinion on it.  Chef Dave here at the theater has used Chef John Folse's ready-made roux and loves it.  Anyway, here we go.

Ingredients
1 cup of oil
1 1/2 cup of all-purpose flour
1 lb andouille smoked sausage (sliced 1/4 in.)
1 rotisserie chicken
1 large onion (diced)
3 -4 ribs of celery (diced)
1/2 lg green pepper (diced)
12 oz. package frozen okra
1 small can Rotel (10 oz. drained) *Optional
2 tbs minced garlic
4 -5 green onions (sliced thin)
8 -10 cups water
4 tbs powdered chicken stock (or 2 stock cubes)
1 tbs Tony Chachere's
1 tsp garlic powder
1 tsp black pepper
1 tsp Italian herbs
2 tbs parsley (dried or fresh)
1/2 tsp cayenne pepper
2 tbs Worcestershire sauce
1 - 2 tbs Louisiana Hot Sauce (your choice)
1 tsp Liquid Smoke *Optional


This Light brown Roux is just perfect.
Preparation
Prepare your Crock-Pot by spraying the inside with non-stick cooking spray.  I use a 7 quart Crock-Pot and I would estimate this recipe makes 4 to 5 quarts. Make sure your Crock-Pot is big enough for this recipe or else you might need to cut back on the amounts listed, or even cut the recipe in half. 

Combine the oil and flour in a cast iron skillet (or similar skillet) and stir constantly, on high, until you have achieved a light brown roux. You do not want a really, really dark mahogany roux, for this recipe it needs to be the color of light chocolate.

Once you have the roux finished, turn off the heat, add your onions, and stir them in and let them cook in the roux for five minutes. You need to let this cool just a bit and transfer it into your Crock-Pot.

Now add all of your celery, green bell pepper, garlic, and green onions (reserve a quarter cup of green onions for garnish). Dissolve the powdered chicken stock in a cup of water. Add this and 8 more cups of water to your Crock-Pot. Stir well to combine the water with the roux, making sure it is dissolved well.

Break your rotisserie chicken down and remove all the bones, skin, fat, and cartilage from the meat.  Give the meat a rough chop, but don't mince it up too fine.  Put this nice chicken meat into the Crock-Pot and stir it well.  Add the rest of your ingredients to the pot give it a really good stir and put the lid on it. I let mine cook for one hour on HI, then I turn it down to LOW and cook for seven more hours.

Serve this gumbo with white rice and garnish with the remaining green onions. If you are able to get filé powder, add 1 tablespoon to this recipe.

If you guys like this recipe, let me know.  I might post my Red Beans recipe for you.  My next post will be about my buddy Eric, who is a Red Bean fanatic, he has a wonderful blog and a crockpot cookbook you guys need to download.  I'll try to get Eric's post lined up next week maybe.

Friday, October 17, 2014

You're tellin' Pork Pies

Look at that tender, flaky crust.
Well, I finally broke down and made an English-type Pork Pie yesterday and it was Wonderful! I always wanted to make one, granted I didn't make a tall, coffee-can-style, pie with all the gelatinous goo in it. I made a traditional pie-shaped meat-filled pastry to die for.

If you're into Cockney Rhyming Slang you'll know that "Pork Pies" means "Lies", but I'm not lying when I say this pie is amazing. You have to try this. Where did I get it, where did I get this recipe??? I STOLE it!!! Yes, I stole it from my own blog. I used my "Jamaican Me Patties Mon" recipe as a starting point. I adjusted a few seasonings and voila! I made a pork pie fit for a King, (who likes blackbirds anyway?)

OK, here it is. Most self-respecting Englishmen, I'm told, only ever eat pork pie cold. Up to you what you do in the confines of your home. It is good cold though, as well as hot out of the oven. Since there are hundreds of videos out there on how to roll out pastry and assemble a pie, I will not dwell to much on that process. Here you go with the goods.

Place the meat in the crust.
Ingredients
Pastry Crust

2 cups plain flour

½ stick of butter (very cold)

⅔ cup of shortening (or lard or bacon grease, or both)

¼ tsp cayenne pepper

¼ tsp salt

⅓ cup of ice cold water
Opt * 1 tbs curry powder

Opt * ½ tsp turmeric

Pie Filling

1 lb ground pork (or any meat)

1 medium onion (diced small)

4 green onions (sliced very thin)

3 -4 cloves of garlic (minced)

1 tbs dried, rubbed sage
2 tbs oil

¼ tsp cayenne

¼ tsp nutmeg

½ tsp salt & pepper (each

½ cup breadcrumbs

2 tbs flour

½ cup of water
2 tbs worcestershire sauce
1 tbs tabasco sauce


1 egg + 1 tbs water for egg glaze

Glazed and ready for the oven.
Preparation
In a mixing bowl sift together all the dry ingredients for the crust, once combined thoroughly, add your shortening and butter. I sometimes dice the butter in small cubes to help mix it easier. Using your pastry blender, have a go at the until it looks like coarse wet sand. Add the ice cold water and work it in. Dump pastry onto sheet of plastic wrap, roll it into a loaf-like shape and seal well with plastic wrap. Put in the fridge for at least an hour, I like it to go over night.

Now for the meat filling, sauté the onions, green onions, and garlic in a pan in the 2 tbs of oil. When wilted, add the meat and stir and mash until meat is broken up. Add spices and cook until meat is done. Add breadcrumbs and sprinkle the 2 tbs of flour over the meat and stir it in. Now stir in ½ cup of warm water to help the binders thicken the meat. Let this cool and take out your pastry dough. Divide the pastry into 2 even pieces. Roll each piece out into a disc, one for the top and one for lining the inside of the pie pan.

Ready to enjoy!
Line the pan, then add all the meat, then the cover and crimp around the edge with the tines of a fork around the edge. Mix your beaten egg and water with a whisk, and brush a thin layer onto top of pie, neatly and completely. Take a sharp knife and make a few slits in the top crust to vent the steam. Pop into a 350º oven for 45 mins. The meat is done inside already so just watch for the egg-glaze to brown properly. Let cool and enjoy. This pie can be made from beef, chicken, lamb, or probably even some type of fish or seafood, Crab seems good to me.

I hope you enjoy this Pork pie as much my buddy Tucker McCandless did, he was nearly speechless, and that is a rare occasion!

Sunday, October 5, 2014

Timmy's Tasty Homemade Granola

Howdy friends, recently I started making homemade yogurt, which was amazing BTW, and all my friends that tried it said, "I bet it'd be good with granola." So I scoured the internet looking for granola recipes. None suited me, so I combined several, added my own two cents, consulted my culinary genius neighbor Jessica, and made my own.

Wow, I can't believe how easy this was and how dang good it is. You'll have to make it daily because it disappears faster than David Copperfield.

Ingredients
1/3 cup dark Karo syrup
1/3 cup brown sugar
1/4 cup coconut oil

1/2 tsp vanilla
1/2 tsp sea salt

3 cups rolled oats

1/2 cup raisins or dried cranberries
1/2 cup sliced almonds
1/2 cup chopped walnuts or pecans

1/2 cup shelled sunflower seeds
 (out of shell)
3/4 cup coconut flakes

1/4 cup flax seed
1 tsp cinnamon

Preparation
Combine the Karo syrup, brown sugar, vanilla, salt, and coconut oil in a small saucepan on medium heat. Cook until the sugar has dissolved and the coconut oil has melted.

Combine all of the oats, seeds, nuts, coconut, *raisins, (or dried cranberries), and cinnamon in a mixing bowl and combine well.

Pour the syrup mixture into the dry ingredients and mix with a wooden spoon. Once you have mixed thoroughly, pour mixture into a large sheetcake pan lined with parchment paper. Place in a 300° oven for 1 hour and 15 minutes. Be sure to take out and stir the granola well every 15 mins.

Remove from oven and give a really good stir to remove any clumps. Be sure to let cool completely before storing in an airtight container. Enjoy possibly the best granola you have ever eaten in your life.

You can use any combination of nuts and seeds in this granola, my next batch I want to include pumpkin seeds and macadamia nuts.

*You might want to leave your raisins or cranberries out unit you've finished baking your granola. It makes them crunchy, although I like them crunchy.

Saturday, September 20, 2014

Black Beans and Rice

OK, I know you're thinking ol' RouxBdoo is on a rice kick. Well I admit it I love rice, especially with tasty stuff in it. This is a VERY SIMPLE one pot dinner you can make as a side for your entrée like fish (great with GRILLED FISH) or chicken. You can also substitute a can of chili with beans and make it more of a TexMex dish. I really like it that way to serve with tacos. Si here we go!

Ingredients
1 16 oz can Black Beans/Frijoles Negros (or a can of Chili with beans)
2 cups water
1 tbs vegetable oil
1/2 cup Pico de Gallo or Ro-tel
3 cloves minced garlic
1 cup rice (uncooked)
1/2 tsp chili powder
1/2 tsp cumin
1/2 tsp Tony Chacere's (or Cajun spices)
1/4 tsp cayenne pepper
1/4 tsp each salt and pepper
3 green onions (diced)

Combine can of beans, water, oil, Pico de Gallo, garlic, and all spices in an ovenproof pot on MED/HI. Bring to a boil, stir in rice and make sure there are no lumps. Cook uncovered for 5 mins. Stir well to make sure rice isn't sticking to the bottom or lumping up. Add green onions, stir well and cover. Cook 5 mins and check rice. If it has nearly soaked up all the liquid, cover and place in 350º oven for 30 mins.

Remove from oven and take off lid, give a stir and make sure rice is tender. Fluff the rice and re-cover for 10 mins. Garnish with any remaining green onions. You might even want to top with some grated cheese or minced cilantro. I sometimes like a dollop of sour cream or thick yogurt alongside.

Tuesday, September 9, 2014

Pawley's Island Shrimp and Rice

I love this dish.  This is a Low Country recipe I created and named after one of my favorite places, Pawley's Island South Carolina.  It's a quaint little location just below Myrtle Beach near the seafood mecca of Murrel's Inlet.  I love this area, where I spent several summers working in my college days.  I would go eat with Miss Francis over at Prince's Palace and marvel at the wonderful food she cooked.  I never knew her to make this dish really but she inspired me to create dishes of my own.

Give this recipe a shot, it's not really as difficult as it might sound... I think you'll love it.

Ingredients
12 - 16 oz of med, peeled, raw shrimp (keep shells and tails)
1 med onion (small diced)
2 tbs minced garlic
6 green onions (white sliced thin, green sliced 1 in long)
1/2 stick butter
6 strips, thick sliced, smoked bacon (diced)
1 green chile or small Anaheim pepper (seeded and diced small)
1/2 cup RoTel (half 10 oz can)
1 tbs worcestershire sauce
1 tbs tabasco sauce
1 tsp Cajun Seasoning
1/2 tsp each salt and pepper
1/2 tsp Italian Herbs (dried)
2 bay leaves
1 1/2 cups long grain rice (raw)
4 cups of water

Directions
In a stockpot, combine shrimp shells, tails, with any scrap onion or garlic parts, cover with the 4 cups of water, and bring up to a boil.  Let boil 5 mins and then turn down to simmer for 30 mins. more.  This should produce about three cups of stock when strained.
Here is our Shrimp dish with Chicken

In an ovenproof pot with a lid, (cast-iron Dutch oven is perfect) melt the butter on MED/HI and add the onion, and garlic, and cook for 5 minutes, then add the bacon.  Stir well and cook for 10 minutes, add green onions (just mostly the white part).  Add all spices and herbs, then add the Worcestershire and Tabasco sauces.  Add the Anaheim pepper and let this cook for a few minutes, all the time stirring as you add ingredients.

Add 3 cups of the shrimp stock and stir thoroughly making sure you get all the little brown bits that accumulate on the bottom of the pot.  This “graton” flavors and colors the rice.  Next add the 1/2 can (or 5 oz.) of RoTel tomatoes to the pot.  After letting this cook for about 5 mins, add the 1 1/2 cups of rice.  As soon as you add the rice, proceed to stir for several minutes, making sure the rice doesn’t stick to the bottom of the pot.

After the stock is up to temperature, you can add the shrimp.  Now let this cook for a while until the rice has absorbed all the liquid.  Place the pot in a 300º oven for about 25 mins.  Check the rice is soft and tender and the liquid is all absorbed.  Take this out of oven and stir to let it steam.  After 10 mins, garnish with green onions and enjoy.

RouxBDooooooooo

Monday, August 25, 2014

Cajun Stewed Chicken

Dust it with Flour
Oh man did I outdo myself the other day fixing this wonderful dish fro some friends of mine.  This is sometimes called Chicken Stew in Cajun households.  It is also similar to the very popular "Chicken Fricassee".  This chicken is falling-off-the-bone tender and the gravy it makes is amazing on either rice or biscuits.  I have to apologize for the lack of a good finished product but many times when I finish a recipe, we're so hungry I forget to take pictures.

So here it is, the chicken pieces are whole and to be frank I like to use legs in this dish, big ones are even better.  You can use a whole chicken, (that's more traditional) I do find that using thighs or wings can leave you with many tiny bones to deal with when the chicken pieces fall apart.  I do recommend or advise to use whole chicken pieces rather than boned, skinned pieces.  Bottom line: try it with big fat legs, you'll thank me.

I am using about 5 lbs of legs for this, I think maybe 12 of them.  I season them and let them marinate in a zip-lock bag in the fridge for a while before making them, from a few hours to overnight if you have time.  Here are the ingredients.

Fry on all sides
Ingredients

5 lbs Chicken pieces
1 med onion (diced)
2 tbs minced garlic
6 green onions (white part diced, green part whole)
1 chicken stock cube
3 cups flour
2-3 tbs oil
2 tbs butter
2 cups AP flour
2 bay leaves
2 tbs Tony Chachere's
1 tbs garlic powder
1 tsp each salt and black pepper
1/2 tsp Italian herb mix
1/4 tsp cayenne


Cover with stock and green onions
Directions
Combine all herbs and spices (last 5 ingredients) and coat all pieces of chicken.  Make sure all the sides are covered.  Place in plastic bag and refrigerate for at least 2 hours.  After marinating, remove chicken from bag and roll in flour making sure each piece gets a good coating.  I let the chicken just lay covered up with flour while heating the oil and butter, on MED HI, in a large oven friendly pot of cast iron dutch oven with a lid.

When oil is good and hot, place the chicken in the pot and brown chicken pieces all over.  after 10 - 15 mins., add your onion and garlic.  Cook another 10 mins until the onions are cooked down.  Dissolve the chicken cube in the water and pour water over the chicken. Stir all chicken pieces until all are neatly covered by the water.  Bring to a boil for 5 mins and turn heat down to MED.  Cook for 15 mins with a lid on, then add all the green onions.  Give the chicken a good stir, place the lid back on and transfer the pot to an oven at 250 degs.

Enjoy the tenderest Chicken ever
I let my chicken go for about 2 hours in the oven, that's what make it "fallin'-off-the-bone" tender.  I like to serve this with rice, mashed potatoes, or good ol' buttermilk biscuits.  You really need to give this dish a try.

Enjoy!

RouxBDoo

Wednesday, August 20, 2014

John Wayne's Corn Dodgers

Corn Dodgers
OK, I gotta admit, I don't think these were what John Wayne was talking about in the original movie True Grit, but I found this recipe for what they called Corn Oysters and they are wonderful.  I think the term "Corn Oysters" is misleading, like "Head Cheese".  OK it's not cheese, by any stretch of the imagination, but the head part is right.

You might think these are fritters but the texture and consistency is totally different.  I use frozen corn because it seems to keep it's crisp in this recipe and I think that's the charm of this dish.  I would call these appetizers or Hors d'oeuvres, but you could serve these as a side dish and NO ONE would complain.

These Corn Dodgers couldn't be simpler, and this batch makes about 36 or so.  You'll need plenty cause no one will stop at a couple.  You have to get the oil hot and gently spoon the batter into the hot oil.  Let them get brown on the bottom before gently flipping them.  Oh boy are these good.  Give them a try!


Ingredients:
Frying up in a pan!

2 cups frozen corn kernels (drained)
1/4 cup milk
1/3 cup AP flour and SR cornmeal combined
1 egg
1/4 tsp salt
1/4 tsp pepper
1/4 tsp garlic powder
1/2 tsp Tony Chachere's
2 tbs butter
2 tbs vegetable oil

Directions:
Place the corn into a bowl with warm water for 5 mins, drain the liquid off, stir in the milk, flour and corn meal, and all seasonings. Melt the butter and heat the oil in a skillet on MED/HI.  Put tablespoon-fulls of the corn batter in the hot skillet carefully.  Fry until brown on bottom, then turn over until other side browns.  Drain the dodgers on a paper towel on a paper plate. Serve warm or keep batches warm in a 200º oven until all are done.  

I sure hope you take the time to make these and try them out, Golly Ned these things are amazing.  
- Enjoy!

Friday, June 20, 2014

He's cooking vegetarian... is he alright?

Look at them pretty Giant Limas!
Well hello and welcome back.  I have been going through some of the dishes I have made here recently and thought I'd surprise you folks by adding a vegetarian soup.  Most of you know I am the farthest thing from a vegetarian, I loves my meats!  I was in the canned vegetable aisle in my local Krogers and saw some great discounts on some items, so I tossed some into the cart and away I went.  I got home and started a mission to come up with something tasty.  I believe I did and here's what I made.

Vegetable Bean Soup

1 15 oz can giant Lima beans
1 15 oz can sweet green peas
1 15 oz can pinto beans
1 15 oz can yellow corn
1 10 oz can RoTel tomatoes
1 15 oz can warm water
1 tbs minced garlic
1/2 cup onion (small dice)
1/2 stick butter
1/2 tsp Tony Chachere's
1/2 tsp each salt and pepper
1 tsp parsley flakes
1/2 tsp dried Italian herbs

This is pretty easy, in a large pot, melt the butter and sauté the onion and garlic until wilted.  Add the remaining ingredients and fold all together.  Bring to a boil while stirring and then turn down on low, cover and cook for a good while.  If you wanted to you could brown a pound of hamburger or add some stewed chicken or beef.  You can add more can of different beans, black beans, white beans, red beans, etc.  Or even black eyed peas, lentils, butter beans, whatever you like, but this was a great combination.

This bean soup is great with rice, wild rice or regular.  You can also spice it up a bit if you'd like as well by adding some tabasco or habanero sauce.  Give this a try!

Cheers,

RouxBDoo!!!

Wednesday, June 18, 2014

Blessed are the Cheesemakers

Heating the milk.
OK, it's not actually one of the Beatitudes, it's from Monty Python, but I am sure there have been blessings bestowed on the most patient people in the food service business... the cheesemaker.  Last week I began my journey to actually become a Cheesemaker.  I attempted to make Chevre, a fresh cheese made from goat's milk.  I had acquired some fresh goat's milk and took a leap.  OK, it didn't turn out quite as expected, I didn't give up and took a different route and finally the cheese developed.  I have to admit it was a bit grainy and crumbly, but had a nice flavor to it.

Last night I inoculated another gallon of goat's milk for another go at it, only this time I made some Feta cheese.  I have always loved Feta (a Greek or Mediterranean white, somewhat salty, cheese that's used more in cooking and salads than eaten alone) I could never get enough of it at Greek restaurants.  They always act like it's their personal lunch they brought to work, serving tiny microscopic granules when you order extra.

Culturing the milk.
Cheesemaking is less like cooking and more like a science experiment, to me at least.  To get the right outcome you need to follow the procedure.  I guess you can experiment but you can waste some valuable milk.  My first batch of Chevre I used a powdered culture that had the rennet included.  This batch of Feta I used buttermilk to set it and liquid rennet to separate it.  What does that mean?  Let look at the process of making nearly any cheese.

1. Heat the milk...
This prepares the milk to accept the culture and allows the culture to go to work.  Different temperatures depending on the cheese and the type culture used.

2. Add a culture...
A culture is live bacteria that is making changes to the milk's PH, allowing the lactic sugars to convert to lactic acid.  It also turns the milk to create different tastes and flavors.  There are several types of cultures, for different types of cheeses.


Set into curds and whey.
3. Wait a bit...
After inoculating the milk, you need to let it sit for a bit.  Sometimes a temperature needs to be maintained.

4. Add the rennet...
Rennet is an enzyme used to cause the milk to separate into curds and whey, just like Miss Muffet dined on.  Rennet comes in several different types, the most popular are animal and vegetable rennet.  They basically do the same thing.  The milk turns into a yogurt-like consistency with a layer of yellow water-like liquid floating on top, that's the whey.

5. Wait a bit more...
The rennet needs time to coagulate the milk.


Cutting the curds.
6. Cut the curds...
The resulting mass of curds are cut into small cubes using a knife or what's known as a cheese harp. This allows the curd to expel more water and densify.  Some cheeses aren't cut, but just scooped out in lumps into the molds.

7. Drain the curds...
The curds are scooped or poured into a mold, sieve, or cloth to let the whey drain off.  Every kind of cheese does this differently.  Some cheeses like Emmentaler or Parmesan use a wooden hoop with a muslin cloth to bind the cheese.  Some cheeses are pressed into a mold using weights to squeeze out any whey and compress the cheese.

8. Drying the cheese...
Some cheeses are dried on the outside to form the rind or to solidify.  Some are then dipped in wax or bound with cloth.  The cheeses are usually turned regularly for a few days.

9. Ripening the cheese...
This is when the cheese is put into the "Cave" to age.  A cave can be a cool, moist room, a wine cooler that can be adjusted in temperature, or a real cave.  The real cave option is where it get's it's name.  It is pronounced calve, as in "the cow is ready to calve"  Some cheeses are ready in a month or so and some go for years.  Longer aging intensifies the flavor.

Some cheeses are eaten fresh, these are the cheeses that are better to learn to make than buy.  Some cheeses are brined as they age, where some are brushed or smeared with brandies and porters to affect the flavor and bouquet.  The varieties are endless.  The key to making good cheeses are great quality milk and sanitary utensils and conditions.  Patience is always a virtue when making cheese.  So how can you make cheese?  Well I will pass along this recipe, you can find it easily online from many sources.

Feta Cheese Ingredients

1 gallon goat's milk (fresh is better, do not use ultra-pasteurized)
1/4 cup buttermilk
1/4 tsp rennet (obtained online)
1/4 cup unchlorinated water
1 - 2 tbs sea salt (non iodized)
Cheese cloth or light muslin
Stainless steel stock pot to hold milk
Slotted spoon
Colander or sieve
Stainless steel bowl
Meat thermometer (not candymaker's thermometer)
Large knife
Measuring spoons

The girls.  They're so sweet.
Set milk out on counter for about an hour before you start.  Put all metal utensils in stock-pot and fill with water. Bring water to a rolling boil to sterilize the utensils.  Plug the drain on the sink.  Remove utensils from pot and let dry on a piece of clean parchment paper, pour water into sink and set pot down into water.  Pour milk into the pot while it's still warm.  Stir using the slotted spoon until the temperature reaches 86 degs.  Add the buttermilk and stir well.  Remove pot from sink and set on stove (off) or counter and let rest for 1 hour.

After an hour, add 1/4 tsp of rennet to the 1/4 cup of cold water.  Mix well and add only 2 tbs of this water with rennet to the milk.  Stir with slotted spoon in an up and down motion for about 30 seconds to mix the milk well.  Don't stir hard or fast just thoroughly.  Let milk rest for another hour.  When an hour has passed, remove the lid and see what has happened.  The milk will look like yogurt with a layer of yellowish liquid on it.

Congratulations, you have made curds and whey.  Now take a knife and cut the curds in a checkerboard pattern, once cut, take your slotted spoon and slowly stir the curds for 15 mins. For an illustration of how curds should be cut, click HERE!

Set your colander or sieve on the bowl, drape the cloth over top of the colander.  If using cheese cloth, be sure to use about 3 layers.  Dip, scoop, spoon or pour the curds and whey into the cloth-lined colander.  Next, pull up the four corners of the cloth and tie them in a knot.  Use a piece of string to hang this onto a kitchen cabinet handle over the sink.  Let the cheese drain for 6-8 hours.  remove from cloth and you have a big ball of cheese of around a pound.  Slice this into 4 equal pieces and sprinkle the salt evenly on the pieces, then place in a Tupperware type container.

Let the cheese sit in the container for about 24 hrs. and drain off the resulting liquid every 3 or 4 hrs. and resalt pieces.  After the 24 hours, place the container in the fridge for as long as you can last without eating it.  A day or two should be fine.  You might want to adjust your salt up or down.  Please use salt either way, it is a preservative plus helps the cheese expel whey.  I found a video that is similar to our method, you can see it by clicking HERE!

I know this post got a little long but I had a lot to say.  I want to thanks a friend from my high school days Lisa Melvin Moreno of  Blaine TN for teaching me this method of making this delicious cheese.  She invited me up to their farm and we had cheese, I got my goat milk, had a sip of moonshine or two, and got to meet her animals including her sweet 2-3 month old baby goats.  Her little doggie, Gordo, conducted the tour of the compound.  Lisa has a wonderful family and nice healthy, happy animals.

If I have left something out feel free to ask me at RouxBDoo@gmail.com.  Have fun chesemaking!

RouxBDooooooooo!!!

Tuesday, June 17, 2014

RouxBDoo's Making a Roux

Mahogany roux looks like melted chocolate.
Well, howdy friends, I know it's been a long time since my last post and I am sorry.  I have been gathering ideas for a while and hopefully my schedule will allow me to get to them.  Thanks for checking in, all my blog followers, I appreciate you folks.

I was having dinner with my family in a Cajun restaurant on Father's Day.  These folks are from Metairie, LA and transplanted up here after Katrina.  Nice folks and good food but I have to say their gumbo was just awful.  It was just a soup, it tasted like a clear chicken broth with nice chunks of white meat chicken, an occasional bite of andouille, and some Ro-tel tomatoes that gave it a sour flavor.  Aside from a bite or two of celery and onion, that was it.

This made me wanna go home and make gumbo... so I did.  I made some gumbo using some catfish filets and smoked sausage.  I ran out of time before I had to go to work, so I let it cool and stored it in the fridge for when I get home tonight.  I'll bring it up to a boil and the let it simmer a few hours.  I might even add some shrimp to it.  I have a picture of the lovely dark mahogany roux I made up for the base.  That's what was missing to me in the gumbo Sunday, a roux.

For my post on how to make a roux, click HERE!  For this gumbo I used a smaller portion.  I use 1/2 cup of vegetable oil and 1 cup of all purpose flour to make the roux.

I hope you enjoy this little teaser, I will get some posts going soon.

RouxBDoo

Wednesday, April 16, 2014

RouxBDoo needs your VOTES!!!

I am currently in a recipe contest with BetterRecipes.com and I need votes.  You can vote every day until April 30th, if you have multiple browsers on your computer, Safari, FireFox, Google Chrome, Internet Explorer, etc. you can vote on each one.  If you have an iPhone, iPad, or even iPod with internet access, you can also vote there on each device.  I don't know if it helps be sure to give it 5 stars too.

The recipe is my Jamaican Me Patties, Mon!  You vote HERE, and if I win, my blog gets featured in the magazine (full page), plus a trip to the Better Homes and Gardens test kitchen, and some cash!!!

I will display the link to vote in case your browser is wonky...

http://appetizer.betterrecipes.com/jamaican-me-patties-mon.html

I really appreciate my readers and I thank all you that have voted.  I will let you know how it all turns out.  Thanks and God Bless.

-RouxBDoo

Monday, February 10, 2014

Stupendous Blue Stilton Salad Dressing

Nice little block of Blue Stilton
One of my favorite cheeses is Stilton and I love Bleu Cheese Dressing, either on salads or Buffalo Chicken Wings.  I have several Bleu Cheese recipes but I was dabbling last night making some dressing and remembered I had some lovely Stilton in the fridge, so I used half of it to make this wonderful dressing.

What is Stilton?  To say that it's Great Britain's version of a Bleu Cheese like France's Roquefort, or Italy's Gorgonzola would be dismissive.  So I found this little tidbit on the Stilton cheese website.


STILTON

Long known as “The King of Cheeses”, blue Stilton is one a handful of British cheeses granted the status of a “protected designation origin” (PDO) by the European Commission. Only cheese produced in the three counties of Derbyshire, Leicestershire and Nottinghamshire and made according to a strict code may be called Stilton. There are just six dairies licensed to make Stilton.

To be called Stilton, each cheese must:

•be made only in the three counties from local pasteurized milk
•be made only in a traditional cylindrical shape
•be allowed to form its own crust or coat
•be un-pressed
•have delicate blue veins radiating from the center
•have a taste profile typical of Stilton.

Ingredients
1/2 cup Mayonnaise
1/2 cup Sour Cream
1/4 cup Whole Buttermilk
2 tsp Balsamic Vinegar
2 tsp Apple Cider Vinegar
1/2 tsp Vanilla Extract
1/2 tsp Black Pepper
1 tsp Tony Chachere's
4 - 6 oz Stilton Blue Cheese (crumbled)

Preparation
Combine the first 8 ingredients, then add your Stilton. You can add more cheese if you'd like. You can use Maytag Blue, Roquefort, or Gorgonzola for this dressing. For a real treat, substitute Maple extract for the Vanilla extract. Watch everyone's reaction.

Saturday, February 8, 2014

Mighty Meatloaf Hash

I was hungry last night and was trying to think of what to fix for dinner.  Leftovers were calling me from the fridge.  Now I LOVE Meatloaf, not the singer, (although I liked him in Rocky Horror) but the dish itself has been a favorite since I was a kid.

I saw I had about 3/4 lb of meatloaf from the day before. I had a fresh, good sized potato, and a medium sized onion in the basket. I thought... hash. Yep, that's the ticket. So here is my Mighty Meatloaf Hash recipe for your entertainment pleasure.

1 lg potato (really small dice)
2 cups meatloaf (chilled and diced)
1 sm - med onion (sliced thin)
1 tbsp garlic (minced)
2 tbs butter
1/2 tsp garlic powder
1/2 tsp black pepper
1/2 tsp Tony Chachere's
3 - 4 cups water

Now start off by boiling the potatoes in a pot of 3 - 4 cups of water until nearly done, drain off water and set them aside.  In a large, hopefully non-stick skillet on LO, sauté the onion and garlic in the butter until slightly wilted.  Add the diced potatoes and combine.  Add all your seasonings and spices and turn over several times to make sure the potatoes are nearly done and soft.  Next add your meatloaf.  Stir it well to make sure everything is combined.  Serve with a green vegetable or legume.

Enjoy