Pitmaster and multiple championship winner Myron Mixon came by the Hatfield and McCoy Dinner show last night. I couldn't resist the chance to meet and talk with him. You couldn't meet a nicer more patient fellow than Myron.
Myron is the star of Destination America's hit show BBQ Pitmasters. Myron judges and departs his wisdom on the show. He is one of, if not the winningest smoker/pitmasters in the world. He and his family came and enjoyed the show. His son and daughter-in-law have seen the show before and he brought Mom and Dad to see our Christmas show.
To see more about Myron, be sure to check out his website for Jack's Old South Competition Team. It sure was nice meeting and chatting with Myron last night. Would love to pick his brain on cooking and smoking. What nice and friendly folks. Thanks for stopping by Myron!
Saturday, November 30, 2013
Monday, October 28, 2013
Weinerdillas or Pigs in a Sarape
I came up with this little recipe between my love for hotdogs on the grill and quesadillas. This is something the kids and your entire family might like. Sometimes I have more hotdogs than buns, so one day I noticed I had some flour tortillas left over and came up with this little gem. With the weather changing I'm not going to have many grilling days left, so let's get at it.
Ingredients
6-8 hotdogs
6-8 flour tortillas
1 8 oz package of shredded Colby/Jack cheese
1 can chili with beans (opt.)
1 cup sour cream (opt.)
1 cup salsa (opt.)
Preparation
First grill your hotdogs on your outdoor grill, take a tortilla and spread about an ounce of shredded cheese on it. When your hotdogs are done, roll it up in the tortilla while it's still hot. Let sit for a minute and the cheese will melt keeping the tortilla in the wrapped position. Lay these back on your grill and let the tortillas get some color on them. You can serve them with chili poured over the top or by mixing the sour cream and salsa together. Top them with some diced green onions for a little extra happiness.
If you don't have a grill, outside or in, you can cook the hotdogs on the stove, roll them in the tortillas and then place them in an oven to brown. I sometimes make a dipping sauce of mayonnaise, creole mustard, and hot sauce to rub them around in. These little guys are great! BTW as you can see from the picture, I like my hotdogs charred black on the grill.
Cheers!
RouxBDoo
Ingredients
6-8 hotdogs
6-8 flour tortillas
1 8 oz package of shredded Colby/Jack cheese
1 can chili with beans (opt.)
1 cup sour cream (opt.)
1 cup salsa (opt.)
Preparation
First grill your hotdogs on your outdoor grill, take a tortilla and spread about an ounce of shredded cheese on it. When your hotdogs are done, roll it up in the tortilla while it's still hot. Let sit for a minute and the cheese will melt keeping the tortilla in the wrapped position. Lay these back on your grill and let the tortillas get some color on them. You can serve them with chili poured over the top or by mixing the sour cream and salsa together. Top them with some diced green onions for a little extra happiness.
If you don't have a grill, outside or in, you can cook the hotdogs on the stove, roll them in the tortillas and then place them in an oven to brown. I sometimes make a dipping sauce of mayonnaise, creole mustard, and hot sauce to rub them around in. These little guys are great! BTW as you can see from the picture, I like my hotdogs charred black on the grill.
Cheers!
RouxBDoo
Wednesday, October 16, 2013
Mamaw Harkleroad's Fried Pies
My Grandmother Bessie Lee Stokes Harkleroad was a wonderful cook, what I remember of her food was it was very simple and tasty. She passed away when I was 10, so I didn't get to enjoy much of her cooking. One thing I remember were her fried apple pies. She made them with her biscuit dough, rolled them out and filled them with fried apples. She would then fry them in a cast iron skillet in a little butter and oil.
This type of pastry is similar to a Mexican empanada. Unlike pie dough, this biscuit dough if soft and very flavorful. I'll give you an easy biscuit recipe to follow.
Ingredients
1 batch of biscuit dough
2 apples (diced small)
1/2 tsp cinnamon
4 tbs sugar
1 pinch of salt
3/4 stick butter (divided into 4)
2 tbs oil
Biscuit Dough
1 cup self rising flour
1/4 cup shortening
1/3 - 1/2 cup buttermilk
1/2 tsp cinnamon
2 tbs sugar
Sift flour into a bowl, add and whisk together the sugar and cinnamon. Work in the shortening either with a pastry blender, fork, or your fingers until it looks like coarse crumbs. Add the buttermilk gradually while stirring it in. When all the dough is combined, dust it with flour, as well as dust your rolling pin.
In a saute pan, melt 1/4 stick of the butter, add the apples, sugar, and cinnamon. Saute until the apples have softened and the sugar is making the apples all tan and sticky. Take the pan off the eye and set aside.
Knead the dough 8 or 10 times and divide the dough into fourths, roll each piece into a ball between your hands and dust it well with flour. On your kitchen counter or cutting board, lay down a piece of clear plastic wrap, and dust it with flour. Have another piece of plastic wrap ready. Flatten the ball of dough in a circle, dust well and lay the other piece of plastic over it. Roll these out into a thin flat circle 6 to 7 inches across, about the size of a saucer.
Add a fourth of the apple mixture into the middle of the dough circle. Moisten the edges with water and fold it over. Use a fork to crimp the edge. Repeat this process with all the dough until you have your 4 pies.
My skillet only has room for two, so I do them in batches. Melt the 1 tbs of butter and a tbs of oil in the MED heat skillet, and fry each side until done, brown and crispy. Try to only turn it once, these are delicate and can break if you handle them too much.
You can use Splenda with this recipe if you're watching your sugar, but I don't have the conversion on the amounts. You also could bake these, but they are so much better fried. I like them like they are, but you can glaze them if you'd like.
Glaze
1 cup powdered sugar
1/2 tsp vanilla extract
1/4 tsp cinnamon
1 tbs warm milk
Combine all ingredients in a small bowl. You might need to adjust the milk a bit to the consistency you like. It should be a little runnier than buttercream frosting.
To my Mamaw Harkleroad, I love you and still miss you. I think about you often what a wonderful beautiful soul you were. I was very lucky to have two wonderful Grandmothers. My maternal Grandmother Marylee Burnette was also a sweet lady and a wonderful cook. I didn't get much time with either of them, but what little I did was great. God Bless my Grandmothers.
RouxBDoo
This type of pastry is similar to a Mexican empanada. Unlike pie dough, this biscuit dough if soft and very flavorful. I'll give you an easy biscuit recipe to follow.
Ingredients
1 batch of biscuit dough
2 apples (diced small)
1/2 tsp cinnamon
4 tbs sugar
1 pinch of salt
3/4 stick butter (divided into 4)
2 tbs oil
1 cup self rising flour
1/4 cup shortening
1/3 - 1/2 cup buttermilk
1/2 tsp cinnamon
2 tbs sugar
Sift flour into a bowl, add and whisk together the sugar and cinnamon. Work in the shortening either with a pastry blender, fork, or your fingers until it looks like coarse crumbs. Add the buttermilk gradually while stirring it in. When all the dough is combined, dust it with flour, as well as dust your rolling pin.
In a saute pan, melt 1/4 stick of the butter, add the apples, sugar, and cinnamon. Saute until the apples have softened and the sugar is making the apples all tan and sticky. Take the pan off the eye and set aside.
Knead the dough 8 or 10 times and divide the dough into fourths, roll each piece into a ball between your hands and dust it well with flour. On your kitchen counter or cutting board, lay down a piece of clear plastic wrap, and dust it with flour. Have another piece of plastic wrap ready. Flatten the ball of dough in a circle, dust well and lay the other piece of plastic over it. Roll these out into a thin flat circle 6 to 7 inches across, about the size of a saucer.
Add a fourth of the apple mixture into the middle of the dough circle. Moisten the edges with water and fold it over. Use a fork to crimp the edge. Repeat this process with all the dough until you have your 4 pies.
My skillet only has room for two, so I do them in batches. Melt the 1 tbs of butter and a tbs of oil in the MED heat skillet, and fry each side until done, brown and crispy. Try to only turn it once, these are delicate and can break if you handle them too much.
You can use Splenda with this recipe if you're watching your sugar, but I don't have the conversion on the amounts. You also could bake these, but they are so much better fried. I like them like they are, but you can glaze them if you'd like.
Glaze
1 cup powdered sugar
1/2 tsp vanilla extract
1/4 tsp cinnamon
1 tbs warm milk
Combine all ingredients in a small bowl. You might need to adjust the milk a bit to the consistency you like. It should be a little runnier than buttercream frosting.
To my Mamaw Harkleroad, I love you and still miss you. I think about you often what a wonderful beautiful soul you were. I was very lucky to have two wonderful Grandmothers. My maternal Grandmother Marylee Burnette was also a sweet lady and a wonderful cook. I didn't get much time with either of them, but what little I did was great. God Bless my Grandmothers.
RouxBDoo
Stuffed Halloween Mini-Pumpkins
| Halloween treats for your dinner guests. |
As a courtesy, I adapted my recipe from the one on this wonderful food blog Kumquat Blog. I did a few things different, but she has some great recipes and pictures over there. Thanks to Gretchen for a wonderful blog, I love it.
Ingredients
4 mini-pumpkins (get the bigger ones)
1 lg apple (I like the Honey Crisp)
3 tbs sugar (you can use brown sugar)
1/4 tsp cinnamon
1/4 tsp nutmeg
1/2 tsp salt
1/2 tsp vanilla extract
2 tbs butter (melted)
1/4 cup chopped walnuts
| Heading into the oven. |
First preheat the oven to 350 degrees. Cut the tops off your pumpkins as in the photo and scoop out all the seeds and goo from the inside. Combine the sugar, salt, cinnamon, and nutmeg in a small bowl. spoon about a half teaspoon of this mixture in each pumpkin and rub it around inside.
Next dice up your apple (skin on) very small. Combine the diced apple, melted butter, vanilla extract, remaining spice/sugar mix, and your walnuts in a bowl and combine thoroughly. Stuff this into your little pumpkins and replace the lid. It's okay to over-fill them a bit.
Place them on a cookie sheet with a piece of parchment paper. Give the pumpkins a little shot with cooking spray, place them in the 350 degree oven for 55 mins to an hour. Let them cool slightly before eating. That's it. Easy, peasy, pumpkin squeezy.
Happy Halloween
RouxBDooooooooooo
Tuesday, October 15, 2013
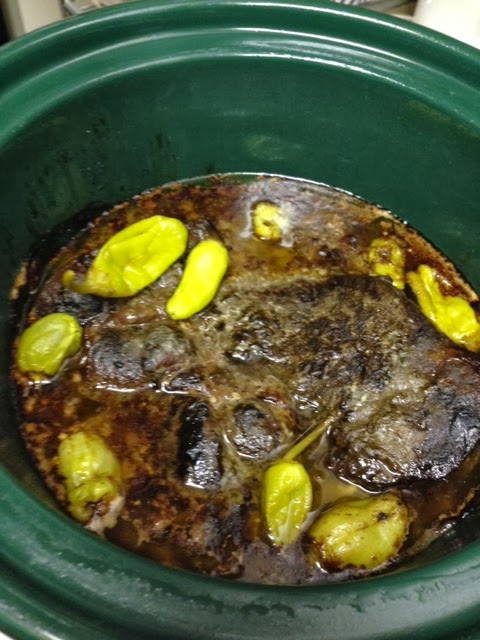
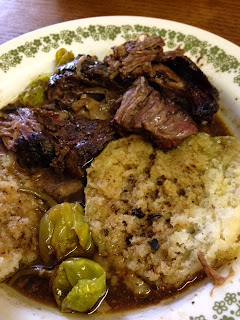
Mississippi Crock Pot Roast Beast
![]() |
| Roast Beast with biscuits. |
As you folks well know, anytime anything goes viral on the internet, everyone's talking about it. This recipe was one of those. This recipe was like an urban legend, so it being close to Halloween I thought I'd make it. Now there's nothing supernatural about it. You don't have to chant the words "Pot Roast" in the mirror 13 times for it to appear, but the method is quite strange for cooking this beast.
I found the recipe several times on the blogs and sites and all pretty much stuck to the gospel. Same ingredients, cooking time, claims of disbelief, but their families loved it. Some make it every week, some twice a week.
What's funny is in the comment section of the blogs that posted this recipe. I have always noticed this but for this recipe it was rampant. After the blogger posted the recipe, about half of the comments were "Awesome", "Amazing", "Delicious", but then the other half, while complimenting them, kept posting what they did different form the recipe. It would be like, "Well we're watching our sodium, fat, red meat, and can't have anything spicy, so I substituted red wine for the au jus, left out the ranch mix completely, exchanged the beef for chicken, and substituted the pepperoncini peppers with kumquats. It was awful."
![]() |
| Yep, that's a stick of butter. |
Now, I will tell you this up front, I expected it to be so tender it would fall apart before you could lift it with a fork. It wasn't quite that way. It was tender-ish, but did it ever have a great flavor. Man the meat and resulting au jus, (gravy) was amazing. Those little peppers added the right combination along with the mixes I added. You have to give this recipe a spin when you can. Maybe an upgrade in the grade of chuck roast, or longer cooking time might make the tender factor elevate.
Be sure if you make this, and love it, to tell me what all you did different from the recipe in the comments you leave. Just kidding, I rarely get comments except from my friend Ramona, whom I love for reading my blog every time.
| Sorry, I am obliged by "Blogger Law" to display the ingredients. |
1 beef chuck roast, 3 - 4 lbs
1 packet McCormicks powdered Au Jus mix
1 packet Hidden Valley powdered Ranch Dressing mix
1 stick of butter
6 - 8 pepperoncini peppers
Preparation
Spray your crockpot with non-stick cooking spray, place roast in the pot, cover top with ranch mix and cover that with au jus mix. Lay the stick of butter on top and scatter the pepperoncinis over the top of the powder covered roast. Replace lid and cook for 8 hrs on LOW.
Now, here's the warning. DO NOT ADD WATER. This roast makes its own juice and blends it with the butter and mixes and... oh bru-thuh is it good. Try it over biscuits like I did, you'll thank me with a big ol' sloppy kiss.
That's it! Can't mess it up. If you do, please write me a comment telling me what you did to mess this up. I'll add it to the "we used wine" "we hate peppers" "I'm a vegetarian, can I make this without meat" comments which always follow a recipe like this.
Drag out that crockpot of yours, or borrow the neighbor's, run to the store and make this recipe. Else you'll always wonder if it was true... what they said about that roast on the internet. Oooooooooo.
"Don't believe everything you read on the Internet" -Abraham Lincoln
I'll have some Halloween fun on here in a few days. Keep the SPIRIT!
Roux-B-Doo-B-Doooooooo
Friday, October 11, 2013
Savory Bread Dressing
I love dressing, or stuffing as some call it, it's my favorite part of the Thanksgiving/Christmas dinner. Some like to ball it up or pat it out into patties, but I love it just baked in a pan. I used some stale bread I had that was still good for this. A mixture of cornbread, biscuits, and sandwich bread made this tasty and varied in texture. You can add pumpernickel, rye, or about any bread to this recipe. Dice it up in small cubes and combine enough for 10 cups.
Ingredients
1 lg onion (diced)
4 ribs celery (sliced thin)
10 cups assorted bread (cubed)
1 tbs garlic (minced)
1 ½ - 2 cups milk
1 egg (beaten)
1 cup water
1 10 oz can Cream of Chicken soup
1 tbs rubbed sage
½ tsp pepper
½ tsp salt
1 tbs Tony Chachere's
1 chicken bullion cube
1 tbs dried parsley
¾ stick margarine
or butter
Preheat oven to 325 degrees.
Place bouillon cube into one cup of boiling water and dissolve. In a large stew
pot on the stove (with a lid), saute' the onions, garlic, and celery in the
margarine, or butter, add spices, and cook until tender. Add bread cubes to
the onion mixture. Stir this well to completely incorporate the onions into the
bread cubes.
Add the cup of chicken stock
you have been boiling, stir it in well to distribute. In a bowl, whisk the egg
and the can of soup into the milk. Pour this into the bread mixture.
Stir thoroughly to make sure everything is blended well.
Place in the 325 degree oven for 55
minutes. After it has baked for 45 minutes, remove the lid for the remaining
10 minutes. You might want to let it go longer after you check it. You also might want your dressing a little wetter or dryer, you can adjust the milk content for this. Also, if you want to delete a cup of milk, you can add another 10 oz can of soup.
Enjoy this dish for the holidays.
Monday, October 7, 2013
Fall Carrot Salad
My Mom’s Carrot Salad is one of my favorite things she used to make and take to Church dinners and covered dish suppers. She’d always make a huge bowl of it, (hence the large portions in this recipe) but that meant we wouldn't have to worry if it would all be eaten up at church. This dish is a little labor intensive chopping up the carrots, cooking the carrots, etc., unless you buy the frozen carrots.
I have cut this recipe in half most times I’ve made it. I also slip a little hot sauce into the dressing you pour over the veggies. Fall always dictates pretty orange colors, and this bright orange salad will hit the spot. Even for non-carrot eaters.
Give this a try for your family or friends and I know they'll love it. This is also a great tail-gating dish they'll all enjoy.
Ingredients
3 lbs fresh carrots (2 pks. frozen) - peeled and sliced
1 lg green pepper - julienned
1 lg onion - quartered and sliced in strips
1 can tomato soup
1 cup oil
3/4 cups vinegar
1 cup sugar
1 tbs worcestershire
1 tbs mustard
1/2 tsp black pepper
1/2 tsp kosher salt.
Preparation
Boil carrots in salt water until tender, drain and let cool. Layer carrots, green pepper, and onion slices. Mix the remaining ingredients, bring to a boil in a saucepan, and pour over the carrots. Cover the container, place in the refrigerator, and let it chill for several hours. Better if you let it sit for 24 hours.
RouxBDoo
I have cut this recipe in half most times I’ve made it. I also slip a little hot sauce into the dressing you pour over the veggies. Fall always dictates pretty orange colors, and this bright orange salad will hit the spot. Even for non-carrot eaters.
Give this a try for your family or friends and I know they'll love it. This is also a great tail-gating dish they'll all enjoy.
Ingredients
3 lbs fresh carrots (2 pks. frozen) - peeled and sliced
1 lg green pepper - julienned
1 lg onion - quartered and sliced in strips
1 can tomato soup
1 cup oil
3/4 cups vinegar
1 cup sugar
1 tbs worcestershire
1 tbs mustard
1/2 tsp black pepper
1/2 tsp kosher salt.
Preparation
Boil carrots in salt water until tender, drain and let cool. Layer carrots, green pepper, and onion slices. Mix the remaining ingredients, bring to a boil in a saucepan, and pour over the carrots. Cover the container, place in the refrigerator, and let it chill for several hours. Better if you let it sit for 24 hours.
RouxBDoo
Sunday, September 22, 2013
Boudin Stuffed Chicken Bundles
![]() |
| Foil wrapped package of Cajun goodness. |
This recipe is very easy, you will need some non-stick aluminum foil, at least I would recommend it. You're gonna roll these and fold the ends. You don't want your chicken to stick.
Ingredients
4 chicken thighs or breasts. (Skinned and boned)
1 link of boudin (6 oz)
2 tbs butter
Salt and pepper
Tony Chachere's.
Preparation
Pre-heat your oven to 350°, rinse off the four chicken thighs, or breasts, and lay them on a paper plate or cutting board. Pound them out a little bit using a hammer or a rolling pin. Sprinkle some salt, pepper, and Cajun Seasoning mix on both sides. Go easy on the salt and Tony's, there's already salt in the Boudin.
Cut your Boudin link into four equal pieces and peel the casing off. Cut 4 small pads of butter and lay one on the inside of each piece of chicken meat. Place the Boudin section on top of the butter, next gather the edges of your chicken and roll it up around the boudin..
Next, carefully wrap these little bundles in their own little piece of non-stick foil and fold over the ends. Pop them in the oven at 350° for 1 hour and 15 mins. Let them cool a bit before serving.
I found Boudin at my local Kroger store.
RouxBDoo
Friday, September 13, 2013
Fried Cornbread Cakes
| Mmmm, don't these crispy critters look good! |
I was sitting around thinking the other night how much I love cornbread. There's Cornbread, Sausage Cornbread, Mexican Cornbread, Cracklin Cornbread, Broccoli Cornbread, etc, etc. I believe I have eaten cornbread just about every way they is.
I have given y'all some great cornbread recipes in the past, so I thought I'd experiment with some fried cornbread for this post. I call them cakes because they're round and about an inch thick, they're about the size of a biscuit. They are lovely, crispy on the outside. I guess you could call them pones. Not sure about cornbread etiquette.
I looked at some recipes and decided to make my own recipe up, starting with my cornbread recipe and then go from there. I love using yellow cornmeal, you don't have to, but I think it tastes better.
I actually did not use my cast iron skillet for this, but next time I make them, I think I might. You will need a portion scoop or what you might call an ice cream dipper, plus you'll need to get your hands greasy. Here we go…
Ingredients
2 cups self-rising yellow cornmeal
2 eggs
2/3 cup buttermilk
3 tbs vegetable oil
1/4 tsp Tony Chachere's
1/4 tsp salt
3/4 - 1 cup Crisco Shortening
Preparation
Combine the dry ingredients in a bowl, add buttermilk, eggs, and oil and mix using a pastry blender. I usually use a whisk for my cornbread but this is much more dense. Spray your skillet with cooking spray, add 1/2 cup of Crisco Shortening, and bring up to MED/HI heat. Test a small bit of the dough in the grease to see if it's hot enough.
Spray a little cooking spray on your hands and be ready to roll! Using the ice cream dipper, scoop out a portion of the dough and roll it into a ball between your hands. It should be slightly bigger than a golf ball. Next, pat it out flat about the size of a Pringles can lid. Sorry these measurements aren't very precise.
![]() |
| Fried Cornbread Cakes getting all crispy |
Ease these little guys into the hot oil/shortening one at a time until your skillet's full. I say ease them because you dont want to break them or splatter yourself with the hot grease. Let them go for a minute or two on each side, making sure they are brown and crispy on both sides. They will double or triple in thickness. This batch makes about 10 "pones", my skillet held 5.
Fry them in 2 batches, letting them drain on a paper towel on a paper plate. You will have to add the remaining 1/4 cup of shortening to the skillet to do the other batch. Let it melt and get up to temp before resuming your frying.
All the recipes I looked at added sugar. As you probably know, I am a child of the South, and eschew sweet cornbread, unless it is for a special dish or variety. You can spread a little honey butter on these or some maple syrup, I suppose. I think they're best dunked in a frosty glass of milk.
Give this recipe a try when you can, I think your family and tastebuds will thank you. These would also be wonderful with collard greens, stewed cabbage, or brown beans. A few slices of vine ripened tomato would also be in order.
Have Fun!
RouxBDoo
Wednesday, September 11, 2013
Acme Lowcountry Kitchen
Recently the wife and I went on vacation in the Charleston/Folly Beach area of South Carolina. What a beautiful place to spend some time. Last year after a trip to Charleston we decided we'd return this year for a longer stay, this year we made our accommodations in Folly Beach at a wonderful guest house.
Now, I had always heard of Isle of Palms and thought it sounded exotic, so we decided to visit while in the area. Isle of palms is essentially on the other side of Charleston from Folly Beach. You can see by the map the proximity. Isle of Palms is very much the way I imagined it, actually it's nicer. Beautiful beach, no clutter of McDonalds, WalMarts, or outlet malls like most vacation destinations. We really relaxed and enjoyed ourselves. When it came to food though, we really lucked up when we found Acme Lowcountry Kitchen.
When we had to wait for a table on a Sunday night I knew we were in the right place. We sat out on the front porch until our name was called and we were then seated in a cozy little dining room. We both love seafood, but my wife needed a break. She ordered the Sweet Tea Brined Chicken. Boy howdy was this ever good. Two large chicken breasts that had been marinaded in sweet ice tea and then fried up nice and crispy. One of the highlights of her selection was some of the most amazing barbecue sauce ever. For me to say that, it really must be something. Many of you know I have my own barbecue sauces I make and cherish, but Golly-Ned, this sauce was incredible and different from any I'd had.
I had an amazing Seafood platter with Shrimp, Scallops, Flounder, and a Crab Cake. This seafood was so fresh and tasty, but I have to tell you one of my favorite parts of the meal... the sides. Usually most seafood joints just pile fries and hushpuppies on your plate, but Acme goes a step beyond and above with their sides. Nothing short of amazing.
Field Peas and grits were the sides I chose. I went with the unadorned creamy, buttery grits. Oh, were they ever good. The big surprise however were those field peas. These peas flavor and consistency of somewhere between a balck-eyed pea, a brown bean, and a Carolina Boiled Peanut. Man oh man, I loved these peas.
The man responsible is Executive Chef Frank Kline. Frank Kline was born in Charleston and graduated from the University of South Carolina with a degree in business. Before college, and after, he worked in several local restaurant kitchens. He then started working in the kitchen of the The Boathouse at Breach Inlet, where he moved from cook, to waiter, to manager. He then was promoted to GM of The Boathouse. After leaving work there, he came to Acme where his friend Bobby Simmons got him a job bartending. Shortly after, Bobby bought the business and Frank took over the kitchen and they went from a Tex Mex restaurant to Seafood. Chef Kline has over 16 years experience in the culinary industry. An award-winning chef, Frank’s focused style is toward the new Southern movement of creating immense flavor from fresh local ingredients.
If you dine here and have the seafood, just know they have dozens of combinations and varieties of seafood fixed in many different ways. Other wonderful entrees, appetizers, and their amazing sides make this a wonderful dining experience. Please don't forget the grits and the field peas, you'll thank me personally. Be sure to visit Isle of Palms when in the area, and make a trip to Acme Lowcountry Kitchen, you'll be glad you did, and tell them RouxBDoo sent you.
Sincerely,
RouxBDoo!!!!
Now, I had always heard of Isle of Palms and thought it sounded exotic, so we decided to visit while in the area. Isle of palms is essentially on the other side of Charleston from Folly Beach. You can see by the map the proximity. Isle of Palms is very much the way I imagined it, actually it's nicer. Beautiful beach, no clutter of McDonalds, WalMarts, or outlet malls like most vacation destinations. We really relaxed and enjoyed ourselves. When it came to food though, we really lucked up when we found Acme Lowcountry Kitchen.
![]() |
| Zoom in to see Folly Beach as opposed to Isle of Palms |
I had an amazing Seafood platter with Shrimp, Scallops, Flounder, and a Crab Cake. This seafood was so fresh and tasty, but I have to tell you one of my favorite parts of the meal... the sides. Usually most seafood joints just pile fries and hushpuppies on your plate, but Acme goes a step beyond and above with their sides. Nothing short of amazing.
Field Peas and grits were the sides I chose. I went with the unadorned creamy, buttery grits. Oh, were they ever good. The big surprise however were those field peas. These peas flavor and consistency of somewhere between a balck-eyed pea, a brown bean, and a Carolina Boiled Peanut. Man oh man, I loved these peas.
![]() | |
|
If you dine here and have the seafood, just know they have dozens of combinations and varieties of seafood fixed in many different ways. Other wonderful entrees, appetizers, and their amazing sides make this a wonderful dining experience. Please don't forget the grits and the field peas, you'll thank me personally. Be sure to visit Isle of Palms when in the area, and make a trip to Acme Lowcountry Kitchen, you'll be glad you did, and tell them RouxBDoo sent you.
Sincerely,
RouxBDoo!!!!
Tuesday, September 10, 2013
Tater Soup Like Mama Made It!
| Hot and creamy Potato Soup |
I have always loved Potato Soup. It was one of my favorite things that my Mom used to make, and still makes. My Mother, Madeline Ramona Harkleroad is 90 years young. She stays very active, is a member of a show choir that performs about 30 shows a year, and has made some wonderful food in my life.
She grew up very poor but never went without good food. My Grandmother and Grandfather worked hard to make sure their children had good food and clothes to keep them warm. My mother grew up loving simple things like biscuits with tomato slices, beans, and whatever Granddaddy could grow in the garden or have from butchering one of their animals.
Whenever I was sick Mama used to make me potato soup. It always seemed to make me feel better. I make mine a bit more elaborate than she did but when I make it I am reminded of those bowls of wonderful comfort food. This is not her recipe but mine. I hope you enjoy it as much as I do. This would be too rich for Mom's taste, she prefers it simple with out a lot of spices.
Ingredients
1 really large baking potato (diced small)
1/2 onion (diced small)
1 stalk celery (diced small)
1 tbs garlic (minced fine)
1/2 stick butter
4 tbs flour
4 cups water
3 cups whole milk
1/2 cup heavy cream
1 tsp Tony Chachere's Seasoning
1 tsp salt
1 tsp black pepper
1/8 tsp nutmeg
1 tbs dried parsley
| My Mom Madeline Harkleroad |
In a med sized pot bring 4 cups of water to a boil, add diced potatoes, cook until tender. In a small stock pot, melt the butter on MED/HI, add onions and cook until softened, add celery, garlic, and all spices. Cook for a few mins, then add flour and incorporate to make a roux (stirring constantly).
When roux is a light tan color, add a cup of "tater water" from the potato pot and whisk into the roux. Once this is smooth and the roux has blended, add 2 more cups of the tater water, 3 cups of milk, and the 1/2 cup of heavy cream.
Now you drain the potatoes and add them into the soup. Stir well and turn down to cook on MED/LO for however long it takes to thicken, or however long you can wait to eat it. Great with cornbread or grilled cheese sandwiches.
Thanks Mama for keeping all us kids fed and being a wonderful mother.
RouxBDoo
Wednesday, September 4, 2013
Tasty Grilled Fish Tacos
| Grilled Fish Tacos |
I spent quite a bit of time in the Yucatan of Mexico when
I worked for the cruise lines. Specifically Cozumel and Playa
Del Carmen. The seafood in these places was
amazing. I feasted on fresh grilled
fish, shrimp and two of my favorites, octopus and conch. Somehow they were tender and very tasty,
considering they can be tough if not prepared right.
One of my favorite places to eat was a restaurant in
Playa Del Carmen called La Floresta. I
have posted about this restaurant before about their tacos with batter fried
shrimp. I have posted a picture below of
the shrimp tacos. Click HERE to see that earlier post about La Floresta.
In my travels in that region I also loved the fish tacos.
Usually it was a white, flaky, very mild tasting fish. Grilled with some garlic and butter and served
plain with a side of pico de gallo, and sometimes mayonnaise. Boy Howdy were they good.
What I am posting today is not necessarily a recipe but a
suggestion of how you can make some of the tasty fish tacos. I am also giving you a tasty sauce to
"kick it up a notch" as Emeril says.
The fish I use most is Swai, it is a Vietnamese catfish I
find at my grocery store and at Walmart. OK now before you turn your nose up at Swai
know this, I am rather snobbish about fish. I DO NOT like oily, fishy tasting fish. These pretty filets come individually wrapped
and frozen. I have never gotten a bad
piece of fish with this kind.
I thaw a couple of filets and cut them in half cross-way
(easier to handle on the grill). I
rinse them off and pat them dry. I
sprinkle them with a bit of Tony Chachere's and some salt and pepper. I use the salt sparingly since the Tony's
has salt in it. Remember some of the spices will fall off
while cooking. Next I brush each side with oil. You can use olive oil but I prefer vegetable
oil. I get my outside grill nice and hot
before I go out. I also spray the grill
with some cooking spray, this helps the fish to keep from sticking.
![]() |
| Shrimp Tacos from La Floresta |
I cook these on MED heat and try not to turn them more
than once. I recommend a metal spatula
rather tongs. The fish will fall apart
if not handled correctly. Let them get
done but not dry out and harden. You're not eating sushi but you're not eating
fish jerky either.
A few minutes on the grill and you can check to see if
they're done. I use small flour
tortillas, I like La Banderita brand, and usually add some pico de gallo or
preferably tomatillo salsa. I love
tomatillo salsa but I don't make it. I
usually pick it up at my local Mexican restaurant who make it great. You can
also use a little sour cream or crema fresca for your tacos.
You can use any fish you'd like but I prefer my Swai. You can also use my "Crema-tillo"
sauce on these. Here is the recipe for it.
Crematillo Sauce
12 oz Sour Cream
1 can Rotel Tomatoes (add the liquid too)
1 tbs Vinegar
1 tsp Tony Chachere's
1/2 tsp Cayenne Pepper
1 tsp Black pepper (I like coarse ground)
1 tbs fresh Cilantro (minced)
Mix together and refrigerate for an hour or two
You can also serve this grilled fish as a great
summertime entree on the grill, I love it and hope you do too.
Enjoy
RouxBDoo
Friday, August 30, 2013
Pan Fried Grits... What???
I love grits, and one of my favorite ways to have them is like my Dad used to fix them. He would make a extra big batch in the morning, we'd eat some and he'd chill the rest in a pan overnight. Next day he'd remove them from the pan, slice them and fry them. Oh man were they ever good!
I recently posted a recipe for creamy grits and I thought I'd continue by posting this easy recipe. I say easy but it's time consuming. You have to wait a day until the grits are set up and ready to fry.
You'll need to start with a different grit recipe, one that uses no cream, milk, or butter. I am sure you'll enjoy these wonderful little crunchy goodies.
Grits
1 cup Quick Grits
3 cups water
1/2 tsp salt
1/2 tsp Tony Chachere's
1/4 tsp black pepper
Preparation
Bring the 3 cups of water to a boil, add spices, and whisk in grits. Stir them to prevent lumping. Quick Grits usually cook in 4 - 5 minutes. When done and thickened, cover with a lid and set aside.
Line a small pan with plastic wrap, pour grits into the pan and shake the pan a bit to make sure them are evenly distributed. Cover them with another sheet of plastic wrap and place in the fridge for 12 - 24 hours.
Fried Grits
One batch of grits (set up)
2 cups plain flour
1 cup of vegetable or corn oil
Once your grits are set up, you'll need to transfer them to a cutting board. Slice your grits about the thickness of steak fries (as pictured). You want to handle them real easy so they don't break. Next, dredge these in flour. Give them a really good coating of flour, they're slightly sticky so the flour usually adheres well.
Warm your skillet up and bring the flour up to temp. I cook mine on MED HI, you can check the temp of the oil by dropping a tiny morsel of flour to see if it sizzles. Fry the grits on both sides in the oil until they're done, nice and crispy. Again, handle them carefully when turning them in the oil and removing them. Drain them on a paper towel and serve hot. These get really hot internally, so be careful.
You can make a more delicate version by lightly flouring the grits and sautéing them in a pan with a tablespoon of butter.
I hope you enjoy these as much as I do.
I recently posted a recipe for creamy grits and I thought I'd continue by posting this easy recipe. I say easy but it's time consuming. You have to wait a day until the grits are set up and ready to fry.
You'll need to start with a different grit recipe, one that uses no cream, milk, or butter. I am sure you'll enjoy these wonderful little crunchy goodies.
Grits
1 cup Quick Grits
3 cups water
1/2 tsp salt
1/2 tsp Tony Chachere's
1/4 tsp black pepper
Preparation
Bring the 3 cups of water to a boil, add spices, and whisk in grits. Stir them to prevent lumping. Quick Grits usually cook in 4 - 5 minutes. When done and thickened, cover with a lid and set aside.
Line a small pan with plastic wrap, pour grits into the pan and shake the pan a bit to make sure them are evenly distributed. Cover them with another sheet of plastic wrap and place in the fridge for 12 - 24 hours.
Fried Grits
One batch of grits (set up)
2 cups plain flour
1 cup of vegetable or corn oil
Once your grits are set up, you'll need to transfer them to a cutting board. Slice your grits about the thickness of steak fries (as pictured). You want to handle them real easy so they don't break. Next, dredge these in flour. Give them a really good coating of flour, they're slightly sticky so the flour usually adheres well.
Warm your skillet up and bring the flour up to temp. I cook mine on MED HI, you can check the temp of the oil by dropping a tiny morsel of flour to see if it sizzles. Fry the grits on both sides in the oil until they're done, nice and crispy. Again, handle them carefully when turning them in the oil and removing them. Drain them on a paper towel and serve hot. These get really hot internally, so be careful.
You can make a more delicate version by lightly flouring the grits and sautéing them in a pan with a tablespoon of butter.
I hope you enjoy these as much as I do.
RouxBDoo
Friday, August 23, 2013
New posts coming for Chaleston SC
This is just a heads-up post about upcoming features of restaurants and fun in Charleston South Carolina. My wife Melaqnie and I recently spent some time in the Charleston area specifically in Folly Beach. We had a wonderful time, met some lovely people, and had some great food.
We also spent some time in Isle of Palms on the other side of Charleston. We took a dolphin excursion boat ride which was one of the highlights of our trip. All next week I will be focusing on some of the restaurants where we had some wonderful seafood and Lowcountry cuisine.
Be sure to check out the new posts starting next week.
Wednesday, August 21, 2013
Tastiest, creamiest Grits EVER!!!
OK, I love grits! I always have. Even before people knew how to make them right. What do I mean by that? I have always had a theory that when most people say the don't like a particular food, they just haven't had it cooked right.
For instance, in most restaurants here in the South, grits have seemed to be an afterthought. For years most restaurants just dumped them in a huge kettle of water and boiled them until they resembled wallpaper paste, in consistency and flavor. It was left up to the self-respecting Southerner to add the salt, pepper, and butter.
Then along came the era of fine dining in the South where dishes once considered mountain cooking, or Soul food all of the sudden were all the rage. Dishes like Shrimp and Grits (a Low Country favorite), or Grillades and Grits (a Creole Restaurant staple) were appearing on menus in all type of fine dining establishments in the South. So Grits got an upgrade.
First thing you know is now they're getting enhanced by ingredients like cheese, andouille sausage, pesto (eww yuck) and even pimento cheese (hmmmm... sounds interesting). The list of additives is endless. Let's talk now about how to fix the best plain grits you've ever eaten.
OK, I am using Quick Grits for this, yes I have fixed the venerable stone ground grits. They are tasty but they do take alot of time and still don't always get tender. Adhering to the warning from "My Cousin Vinnie"'s claim that "no self-respecting Southerner would use instant grits" I do actually use Quick Grits, a happy medium. Instant grits are just that, dump them in hot water and they're done. Quick Grits on the other hand require you to boil the water, add the grits and cook for around 5 mins. There are several brands, Quaker Oats, Jim Dandy, WalMart, etc. All are about the same. So here we go.
BTW, I had the "best grits ever in a restaurant" recently in Isle of Palms SC at Acme Lowcountry Kitchen. What great food and wonderful folks here at this restaurant. I also want to give a Grits Shout-out to The Noisy Oyster in Charleston SC near the market. Their Shrimp and Grits were the second best I've had... next to mine. I highly recommend both of these restaurants when in the Charleston/Folly Beach area.
Tastiest, creamiest Grits EVER!!!
1⅓ cups of water
1⅓ cups of Heavy Cream
⅔ cups of Quick Grits
½ tsp salt
¼ tsp pepper
¼ tsp Tony Chachere's
1 tbs butter
Boil the water on MED HI in a medium sized pot, add spices, once boiling add cream, bring back up to a boil. Now add the grits, whisking them in as you pour them to prevent lumpiness. Stir them well and bring up to a boil. Now turn them down to LOW and let them cook for about 5 mins with a lid on, stirring occaisionally. Add butter and whisk it in. Turn off stove and let grits sit for about 10 mins before serving. I believe you'll agree they are wonderful.

For Cheese Grits, you can add a cup of your shredded Colby/Jack cheese if you'd like after the butter has melted. Adding Andouille Sausage requires you to micro dice the sausage and add it to the water in the first step.
Have fun and experiment with your grits, a grit is a terrible thing to waste.
RouxBDoo
For my Shrimp and Grits recipe, (pictured above) click HERE
For instance, in most restaurants here in the South, grits have seemed to be an afterthought. For years most restaurants just dumped them in a huge kettle of water and boiled them until they resembled wallpaper paste, in consistency and flavor. It was left up to the self-respecting Southerner to add the salt, pepper, and butter.
Then along came the era of fine dining in the South where dishes once considered mountain cooking, or Soul food all of the sudden were all the rage. Dishes like Shrimp and Grits (a Low Country favorite), or Grillades and Grits (a Creole Restaurant staple) were appearing on menus in all type of fine dining establishments in the South. So Grits got an upgrade.
First thing you know is now they're getting enhanced by ingredients like cheese, andouille sausage, pesto (eww yuck) and even pimento cheese (hmmmm... sounds interesting). The list of additives is endless. Let's talk now about how to fix the best plain grits you've ever eaten.
OK, I am using Quick Grits for this, yes I have fixed the venerable stone ground grits. They are tasty but they do take alot of time and still don't always get tender. Adhering to the warning from "My Cousin Vinnie"'s claim that "no self-respecting Southerner would use instant grits" I do actually use Quick Grits, a happy medium. Instant grits are just that, dump them in hot water and they're done. Quick Grits on the other hand require you to boil the water, add the grits and cook for around 5 mins. There are several brands, Quaker Oats, Jim Dandy, WalMart, etc. All are about the same. So here we go.
BTW, I had the "best grits ever in a restaurant" recently in Isle of Palms SC at Acme Lowcountry Kitchen. What great food and wonderful folks here at this restaurant. I also want to give a Grits Shout-out to The Noisy Oyster in Charleston SC near the market. Their Shrimp and Grits were the second best I've had... next to mine. I highly recommend both of these restaurants when in the Charleston/Folly Beach area.
Tastiest, creamiest Grits EVER!!!
1⅓ cups of water
1⅓ cups of Heavy Cream
⅔ cups of Quick Grits
½ tsp salt
¼ tsp pepper
¼ tsp Tony Chachere's
1 tbs butter
Boil the water on MED HI in a medium sized pot, add spices, once boiling add cream, bring back up to a boil. Now add the grits, whisking them in as you pour them to prevent lumpiness. Stir them well and bring up to a boil. Now turn them down to LOW and let them cook for about 5 mins with a lid on, stirring occaisionally. Add butter and whisk it in. Turn off stove and let grits sit for about 10 mins before serving. I believe you'll agree they are wonderful.
For Cheese Grits, you can add a cup of your shredded Colby/Jack cheese if you'd like after the butter has melted. Adding Andouille Sausage requires you to micro dice the sausage and add it to the water in the first step.
Have fun and experiment with your grits, a grit is a terrible thing to waste.
RouxBDoo
For my Shrimp and Grits recipe, (pictured above) click HERE
Wednesday, August 7, 2013
Big Batch Barbeque Baked Beans
Recently I needed to fix some BBQ'd beans for a cookout for about 20 people. So I reworked my bean recipe and ended up making it a little cheaper and easier. As for the BBQ sauce, I use the BBQ sauce recipe that I make, but you can also use any brand of traditional sauce. I actually like Sweet Baby Rays, or Cattlemans. Stay away from Kraft, I'm sorry but their's is awful.
Anyway, now that I've pissed off a major food manufacturer, let's go on with the recipe. Enjoy this for a picnic or any sort of cookout, church social, etc. Especially at church, when you take these beans, there's usually music to follow!
I have listed the recipe for my Blackwood Barbecue Sauce at the bottom of the page for your reference.
Ingredients
5 15 oz cans Van Camps Pork and Beans. Or comparable brand
8 slices bacon (diced small)
1 lg onion (diced)
1 tbs Garlic (minced)
1 1/2 cups barbecue sauce.
1/4 cup Worcester sauce
1 tbs Tabasco sauce
1 tsp Tony Chachere's
1/2 cup green onions (sliced thin)
1/2 cup brown sugar.
1/2 tbs each salt and black pepper
2 tbs Liquid Smoke
Preparation
Anyway, now that I've pissed off a major food manufacturer, let's go on with the recipe. Enjoy this for a picnic or any sort of cookout, church social, etc. Especially at church, when you take these beans, there's usually music to follow!
I have listed the recipe for my Blackwood Barbecue Sauce at the bottom of the page for your reference.
Ingredients
5 15 oz cans Van Camps Pork and Beans. Or comparable brand
8 slices bacon (diced small)
1 lg onion (diced)
1 tbs Garlic (minced)
1 1/2 cups barbecue sauce.
1/4 cup Worcester sauce
1 tbs Tabasco sauce
1 tsp Tony Chachere's
1/2 cup green onions (sliced thin)
1/2 cup brown sugar.
1/2 tbs each salt and black pepper
2 tbs Liquid Smoke
Preparation
To start off, open the cans of Pork and Beans. Drain off all
the extra gooey liquid from the top of the cans. The beans usually settle on
the bottom. If they're too "saucy/soupy" set them in a drainer in the
sink while you prepare onions, etc. (never rinse this off) In a large
oven-ready pot, combine bacon with the diced onions, garlic, and dry spices.
Sautè until softened. Add remaining ingredients. Combine and stir really well.
Place in oven for 45 mins at 350°.
Blackwood Barbecue Sauce
5 C ketchup
1 1/2 C molasses
1 1/2 C brown sugar
1/2 C Worcestershire sauce
1/2 C yellow mustard
1/4 C liquid smoke
1/4 C oil
2 tbsp Tabasco
sauce
1 tbsp creole seasoning
1 tbsp black pepper
1 tbsp garlic powder
2 tbsp vinegar
Mix all ingredients in a large pot, bring to a boil,
stirring and being careful not to allow it to burn. Store in airtight jars or
bottles.
Tuesday, August 6, 2013
Zac Brown Band - "Eat and Greet"
Well friends I have a guest poster for this go around. Amy Vaughan contacted me about writing a post about Louisiana Chef Rusty Hamlin. Rusty is the executive Chef for the Zac Brown Band. Sounded like something that my readers would enjoy. Thanks Amy for your help and interest. Take it away!
What’s sweeter than the sound of a traveling country/folk
band? A country/folk band that serves down-home cooking, that’s what!
The Zac Brown Band is on the road, both as legendary
musicians and foodies. Its “Eat &
Greet” phenomenon is the hottest ticket around; the band tours alongside a
54-foot tractor trailer that happens to also be its mobile kitchen. At the helm
is executive chef Rusty Hamlin. Rusty cooks in the tradition of Louisiana and
the American South, having taken over from Zac Brown, himself. Zac had been the
owner and executive chef, serving four generations of family recipes of
Southern gourmet cuisine, but sold his restaurant and music venue in order to
purchase the band’s tour bus so that they can tour full-time.
Now, the mobile kitchen has a six-burner stove, four ovens,
an 18-foot prep area with three-compartment sink and tilting skillet and a
full-size walk-in refrigerator. So, what is an “Eat & Greet”? When you attend an Eat & Greet, you dine with the band – buffet-style Southern food
(including, of course, LandShark Lager and Jack Daniel’s)—and have the
opportunity to socialize with the musicians over dinner.
What are you waiting for? The band is waiting to dine with you.
Amy Vaughan
Monday, August 5, 2013
Yellow Squash Dressing
My friend Blake Hopper is a wonderful multi-instrumentailst, but he really shines on the 5-string banjo. He also excels at cooking good ol down home country food. We swap recipes from time to time, but his wife Christie, who is an amazing baker and cook flung this recipe on me after Blake had brought it into work. Oh man, oh man is it good. Give it a try for a side at dinner, especially good at Thanksgiving.
Ingredients
2 cups Yellow Squash (sliced thin or cubed)
2 cups cornbread (diced)
1 10oz can of Cream of Chicken Soup
½ onion (diced)
½ tsp salt
½ tsp pepper
½ tsp rubbed sage
1 tbs butter
*opt. ¼ cup green onions (sliced thin)
*opt. 1 tbs garlic clove (minced)
Preparation
PreHeat Oven to 375 degrees.
Place your diced or sliced yellow squash in a pot with the onions, green onions, garlic and just cover them with water. Bring to a boil and turn down a bit and cook til the yellow squach is nearly done and has softened. Carefully pour the water off reserving a bit (probably about 1/2 a cup) of the water. Add butter and spices. Mix in the cornbread, spices, soup mix, with the squash/veggie mixture, and pour into a glass casserole dish, or similar oven proof vessel.Ingredients
2 cups Yellow Squash (sliced thin or cubed)
2 cups cornbread (diced)
1 10oz can of Cream of Chicken Soup
½ onion (diced)
½ tsp salt
½ tsp pepper
½ tsp rubbed sage
1 tbs butter
*opt. ¼ cup green onions (sliced thin)
*opt. 1 tbs garlic clove (minced)
Preparation
![]() |
| Myself on the left with Blake Hopper on the right. |
Place in oven for 45 mins uncovered. It's just that easy. Warning, do not use a sweet cornbread with this recipe. Thank you Blake for the recipe and for being such a great guy to work with. Thanks Christie for feeding Blake well. The picture above is Blake (on right) and myself playing out Gibson Banjos in The Hatfield and McCoy Dinner SHow in Pigeon Forge TN. Come see us!
RouxBDoo
Tuesday, July 23, 2013
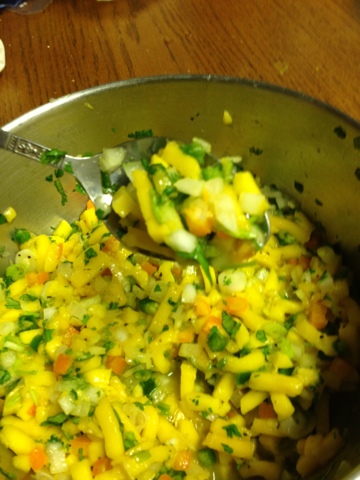
Tangy Mango Salsa
While making Pico de Gallo recently, I did some experimentation using mango instead of tomato with some wonderful results. Check it out.
Ingredients
1 1/2 - 2 cups mango (finely diced)
3/4 cup onion (finely diced)
4 green onions (thinly sliced)
1 large jalapeño (finely diced)
1 lime (juice)
1/4 cup cilantro (minced)
1/2 red or orange bell pepper (minced)
1/4 tsp salt
1/4 tsp pepper
Preparation
Cut mango meat from around the pit with a paring knife, peel the chunks of mango, I actually left about a fourth of one mango unpeeled. Mix all other ingredients well and refrigerate to let the salsa "get happy".
Serve with blue corn chips or with pork or chicken. You can also top a nice piece of fish with this wonderful salsa.
Monday, July 22, 2013
SquatchIt!!!
OK, I know this is waaaaayyy off topic, but if there's
anything I love as much as Cajun food, that's Bigfoot. Now there is a
company marketing a Bigfoot call called SquatchIt! Here's their
introduction below. Check them out on the Kickstarter Campaign. Check
out their page at "SquatchIt"
It's time to SquatchIt! This new novelty noisemaker is tons
of BigFoot fun! It's LOUD and SCARY sounding and it's battery-free! SquatchIt
is a next-generation noise maker that sounds like a Sasquatch scream. Imagine
the look on your friends' faces on a camping trip when you sneak off and blow
SquatchIt into the dark, spooky night! Are you tired of annoying politicians
and their false promises? Go to the rally and SqautchIt! Are the kids acting up
and not behaving? Just SquatchIt! Don't carry one of those air horns to the
football game.. Just SquatchIt! Soon you will be able to get your very own
SquatchIt and get in on the Big-Time BigFoot FUN! SUPPORT US ON KICKSTARTER! SUNDAY JULY 21, 2013 3:00PM CST- WEDNESDAY AUGUST 21, 2013 3:00
PM CST
Yellow Squash Relish
Here's another of one of my favorite things. I published the recipe 2 years ago in my "Pickle Silly" post. I had requests for it recently, so here is my Yellow Squash Relish recipe.
Friends have been loading me up with produce this summer and I thought I'd make something different, why not relish. I had no idea how this would taste but I thought I'd give it a try. Keep in mind, in addition to the squash I also got zucchini, cucumbers, green peppers, onions, etc. so I would have a vast array of ingredients to choose from. Of course the only problem remaining would be the spices.
Now I keep, on-hand, a fairly decent collection of spices, but I did not have turmeric, mustard seeds, celery seeds, and so-on. This was where it ran into a little money, also I needed jars, lids, and caps. I got all my spices for under $15 and they will do me for a while, (my mother had a container of garlic powder for around 17 years, she cooked very plain). Below is the recipe.
Yellow Squash Relish
4 cups squash and/or zucchini (diced)
1 cup onion (diced)
½ cup red bell pepper
1 cup white vinegar
1 ½ cup white sugar
1 tsp celery seeds
1 tsp mustard seeds
1 tsp turmeric
½ tsp hot pepper flakes
¼ cup kosher salt
1 cup water
Cut the yellow squash and zucchini, in quarters, lengthwise. Remove the seeds and dice them extremely small. I dice up 2 cups of squash and 2 cups of the zucchini. Dice one onion into small dice, it should be a cup, as well as a red or green bell pepper, use about half a cup. Red looks better.
Place in a large bowl and sprinkle ¼ cup salt and add 1 cup water. Stir well and let stand 1 hour in the refrigerator. Drain well and rinse with cold water twice. Transfer this into a couple of jars. Bring vinegar, sugar, and all remaining ingredients in a pot and bring to a boil. Pour hot mixture over vegetables in the jars. Let cool then refrigerate, then use as needed. By the way, you can slice the squash and make these in a more traditional method. Enjoy the Summery treat.
Yellow Squash Relish
4 cups squash and/or zucchini (diced)
1 cup onion (diced)
½ cup red bell pepper
1 cup white vinegar
1 ½ cup white sugar
1 tsp celery seeds
1 tsp mustard seeds
1 tsp turmeric
½ tsp hot pepper flakes
¼ cup kosher salt
1 cup water
Cut the yellow squash and zucchini, in quarters, lengthwise. Remove the seeds and dice them extremely small. I dice up 2 cups of squash and 2 cups of the zucchini. Dice one onion into small dice, it should be a cup, as well as a red or green bell pepper, use about half a cup. Red looks better.
Place in a large bowl and sprinkle ¼ cup salt and add 1 cup water. Stir well and let stand 1 hour in the refrigerator. Drain well and rinse with cold water twice. Transfer this into a couple of jars. Bring vinegar, sugar, and all remaining ingredients in a pot and bring to a boil. Pour hot mixture over vegetables in the jars. Let cool then refrigerate, then use as needed. By the way, you can slice the squash and make these in a more traditional method. Enjoy the Summery treat.
Easy Budget Gumbo
I wanted gumbo the other day, seafood gumbo, but I was really low on funds and couldn't see buying pounds of crabmeat, shrimp, oysters, etc. So I bought some filets of Swai in the freezer section (individually wrapped), 2 small cans of crabmeat (under $2.00 each) and a lb of frozen shrimp, peeled and deveined. Along with my love of andouille sausage in seafood gumbo (I know I am making enemies to you gumbo purists) I managed to stir up a great pot of gumbo for a fraction of the usual cost. Give it a try, it's very tasty!
Ingredients
¾ cup vegetable oil
1 cup plain flour
1 large onion -- diced
3 stalks celery -- sliced thin
½ cups green pepper -- diced
4 cloves or 1 tbs garlic -- minced
3 whole bay leaves
1 tsp black pepper
½ tsp cayenne pepper
1 tbs salt
1 tbs filé powder
4 tbs worcestershire sauce
1 tbs tabasco sauce
8 - 10 cups water
1 lbs. Shrimp -- frozen small, cleaned, de-veined
2 cans crab meat
4 8oz Swai (or catfish) filets
1 lb okra (frozen or fresh 1/2 in. slices)
*opt. 12 oz andouille sausage (sliced thin)
Preparation
Place the catfish filets in a pot with 6 cups of water. Turn the heat on MED and let them poach until the are done and will crumble. Set aside and retain the broth.
In a 7 qt., cast iron Dutch Oven, or similar kettle, heat oil on MED, when hot, add flour and stir continuously until the roux reaches a dark brown color. Add diced onions and cook until onion is wilted, then add celery, green pepper, and garlic, and cook another 10 mins. Add herbs and spices, (except filé powder) stir constantly, cook 5 mins.
Add 2 cups of the hot catfish broth, whisk in and blend well, cook for another 5 mins. Add remaining stock, 3 more cups of water, andouille sausage, crabmeat, crumbled catfish meat, and shrimp, then bring to a boil for 5 mins. Cook okra in a seperate skillet in 1/4 cup of oil for 20 mins. or until it softens and quits sliming, add it and the filé powder to gumbo. Bring back down to MED/LO and cook 1 hour or more, stirring occasionally. Finish up by checking seasonings. Just let it simmer another half hour on MED/LO.
Subscribe to:
Posts (Atom)